



(2023)
(2023)
OSENSA EdgePi Portal
OSENSA EdgePi Portal
Conceptualized EdgePi’s proprietary portal, a platform that enables the cloud based industrial PC to be configured remotely.
Conceptualized EdgePi’s proprietary portal, a platform that enables the cloud based industrial PC to be configured remotely.
In the Spring of 2022, I had the opportunity to join OSENSA Innovations as a UI UX Designer co-op student, working exclusively on EdgePi, a revolutionary cloud based industrial PC. This Raspberry Pi powered industrial PC is capable of being configured online through its online portal. Data read from EdgePi can be saved onto the cloud where it can be viewed through Grafana, an analytics and data visualization web application.
In the Spring of 2022, I had the opportunity to join OSENSA Innovations as a UI UX Designer co-op student, working exclusively on EdgePi, a revolutionary cloud based industrial PC. This Raspberry Pi powered industrial PC is capable of being configured online through its online portal. Data read from EdgePi can be saved onto the cloud where it can be viewed through Grafana, an analytics and data visualization web application.
ROLE
Product Design Co-op
TIMELINE
May 2021 - Apr 2023
ORGANIZATION
OSENSA Innovations
TEAM
EdgePi
PLATFORM
EdgePi Portal
TYPE
B2B + B2C
RESPONSIBILITIES
End-to-end Product Design
Design Thinking Methods
UI+UX
Design System
Branding Guide
Touchpoint Design
Photography
Designing and shipping my first end-to-end experience.
The release of EdgePi Portal V1.0.0 in numbers.
6
Unique touchpoints
Spanning across website, e-comm store, product label, packaging & digital portal.
86
Monthly active users
Consisting of ~60% industrial users and ~40% hobbyists.
72%
Conversion rate
From a free to a paid plan, unlocking additional remote access features.
4.0/5
Average feedback rating
From a survey sent via e-mail to all purchasing customers.
Designing a dashboard interface for industrial and hobbyist users.
Utilizing a multitude of interaction design methods and co-design sessions with my co-workers, I instilled a design culture within the company to inform the development process.
Utilizing a multitude of interaction design methods and co-design sessions with my co-workers, I instilled a design culture within the company to inform the development process.
During this year-and-a-half-long co-op, I led the end-to-end development process of EdgePi Portal's multiple touch-points from initial concept through to final delivery. I created a design system to ensure scalability of the platform and consistent branding throughout EdgePi's touch-points such as its marketing website, packaging, and device label.
During this year-and-a-half-long co-op, I led the end-to-end development process of EdgePi Portal's multiple touch-points from initial concept through to final delivery. I created a design system to ensure scalability of the platform and consistent branding throughout EdgePi's touch-points such as its marketing website, packaging, and device label.
How Might We ...
Create an intuitive, human centric platform, that captures the full functionality of an Industrial PC/PLC/IoT device, while simplifying its inherent complexity in order to cater to both professionals utilizing EdgePi for industrial factory automation, and novice/ hobbyists utilizing EdgePi for home & school projects.
HIGHLIGHTS
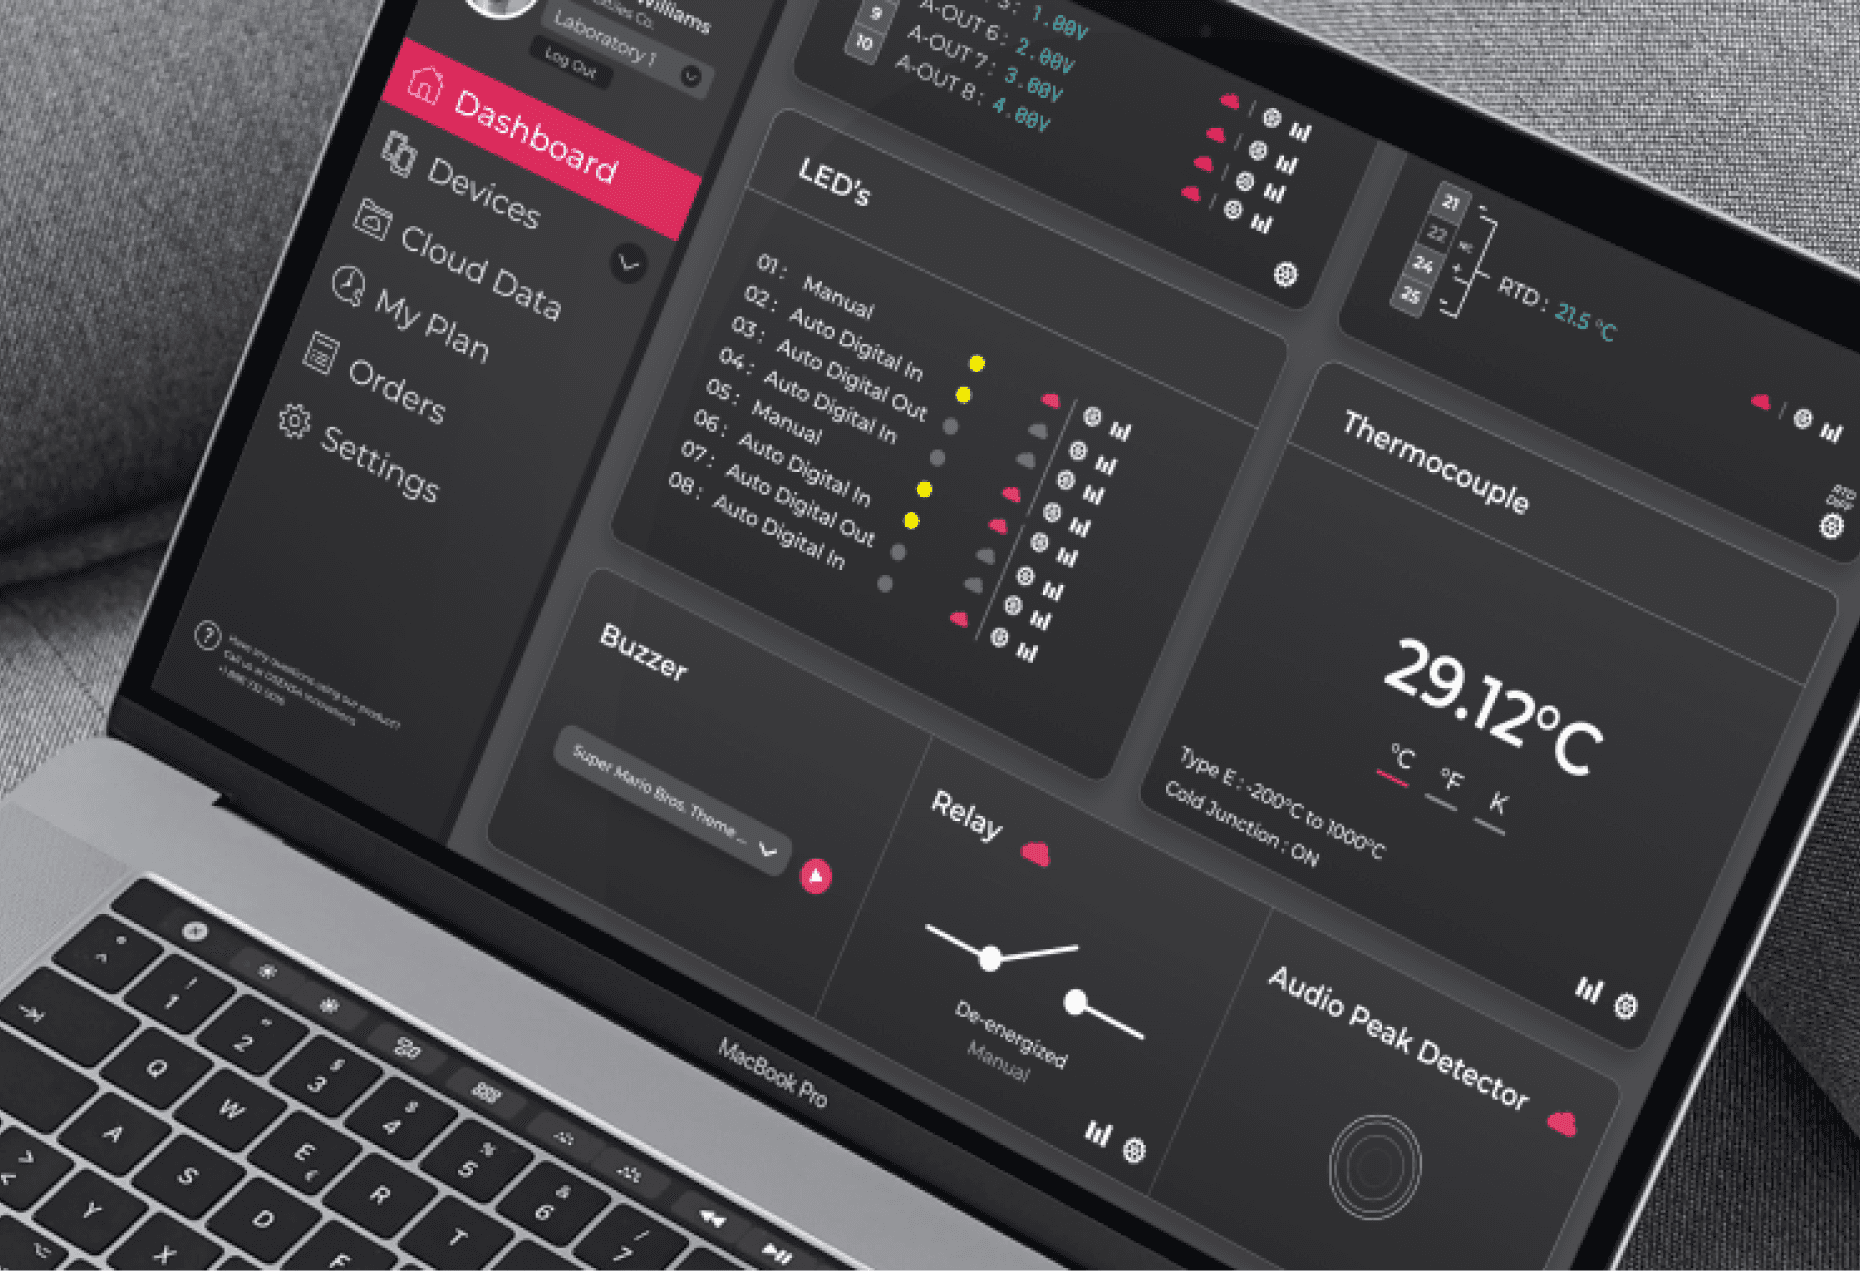
An intuitive layout & visual design
Content is organized into digestible chunks with each module being displayed as cards, allowing for better legibility and reduced cognitive load for users.
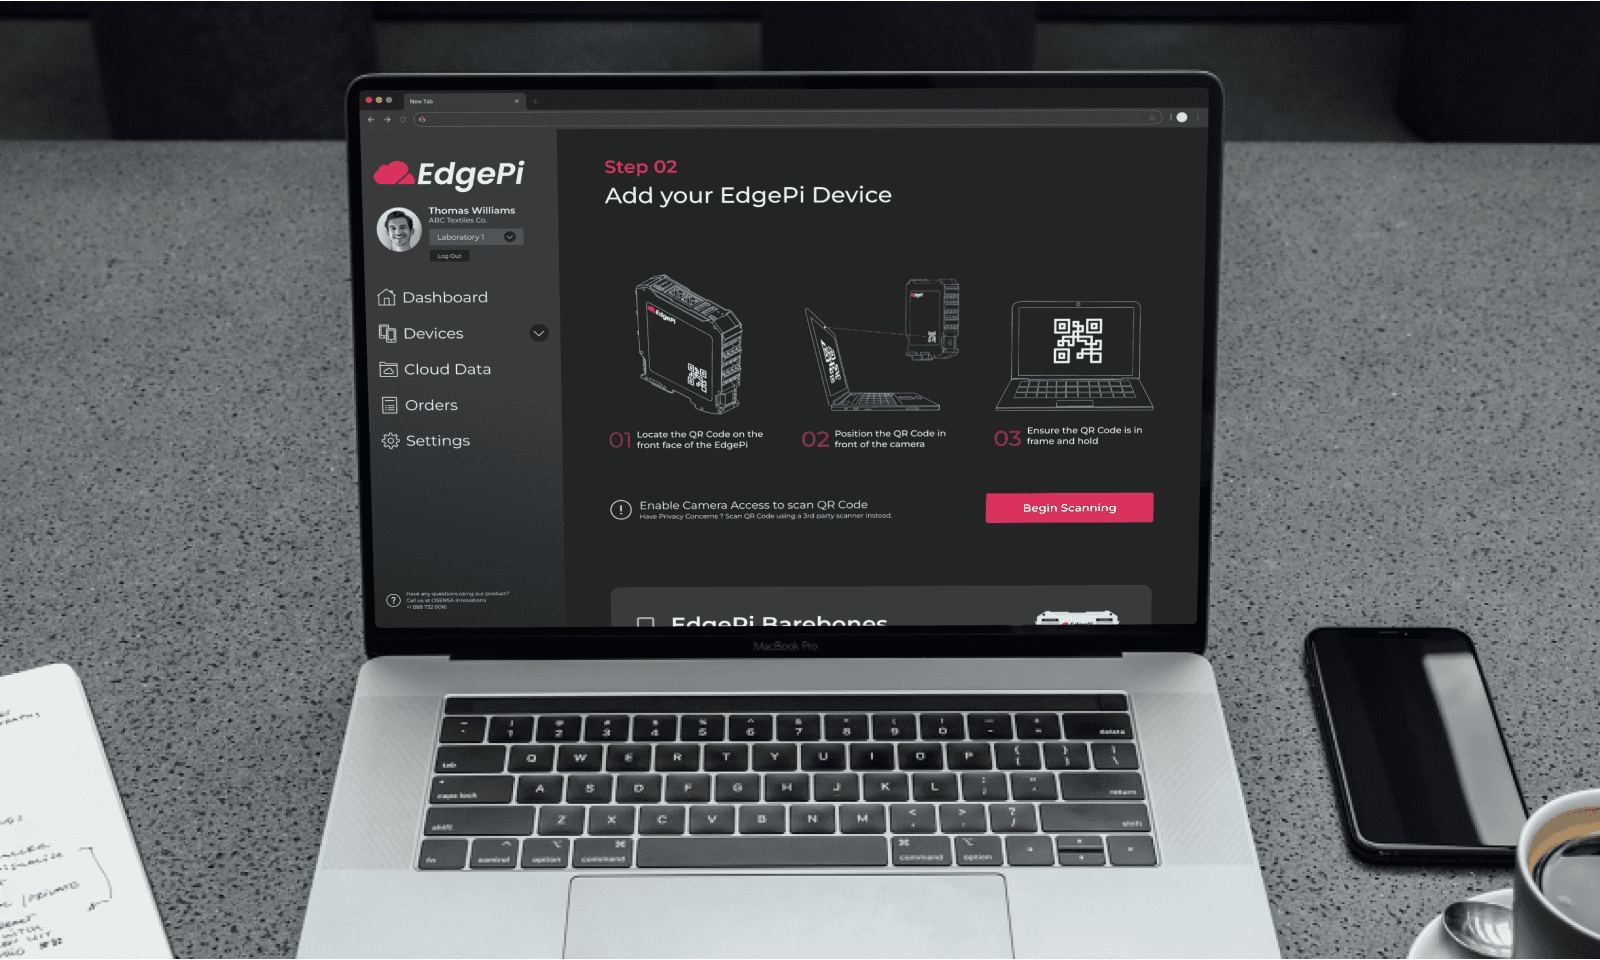
Begin reading and configuring in minutes
Users are instructed to scan the unique QR Code located on the back of the EdgePi enclosure and attach the newly added device to a prepaid data plan.
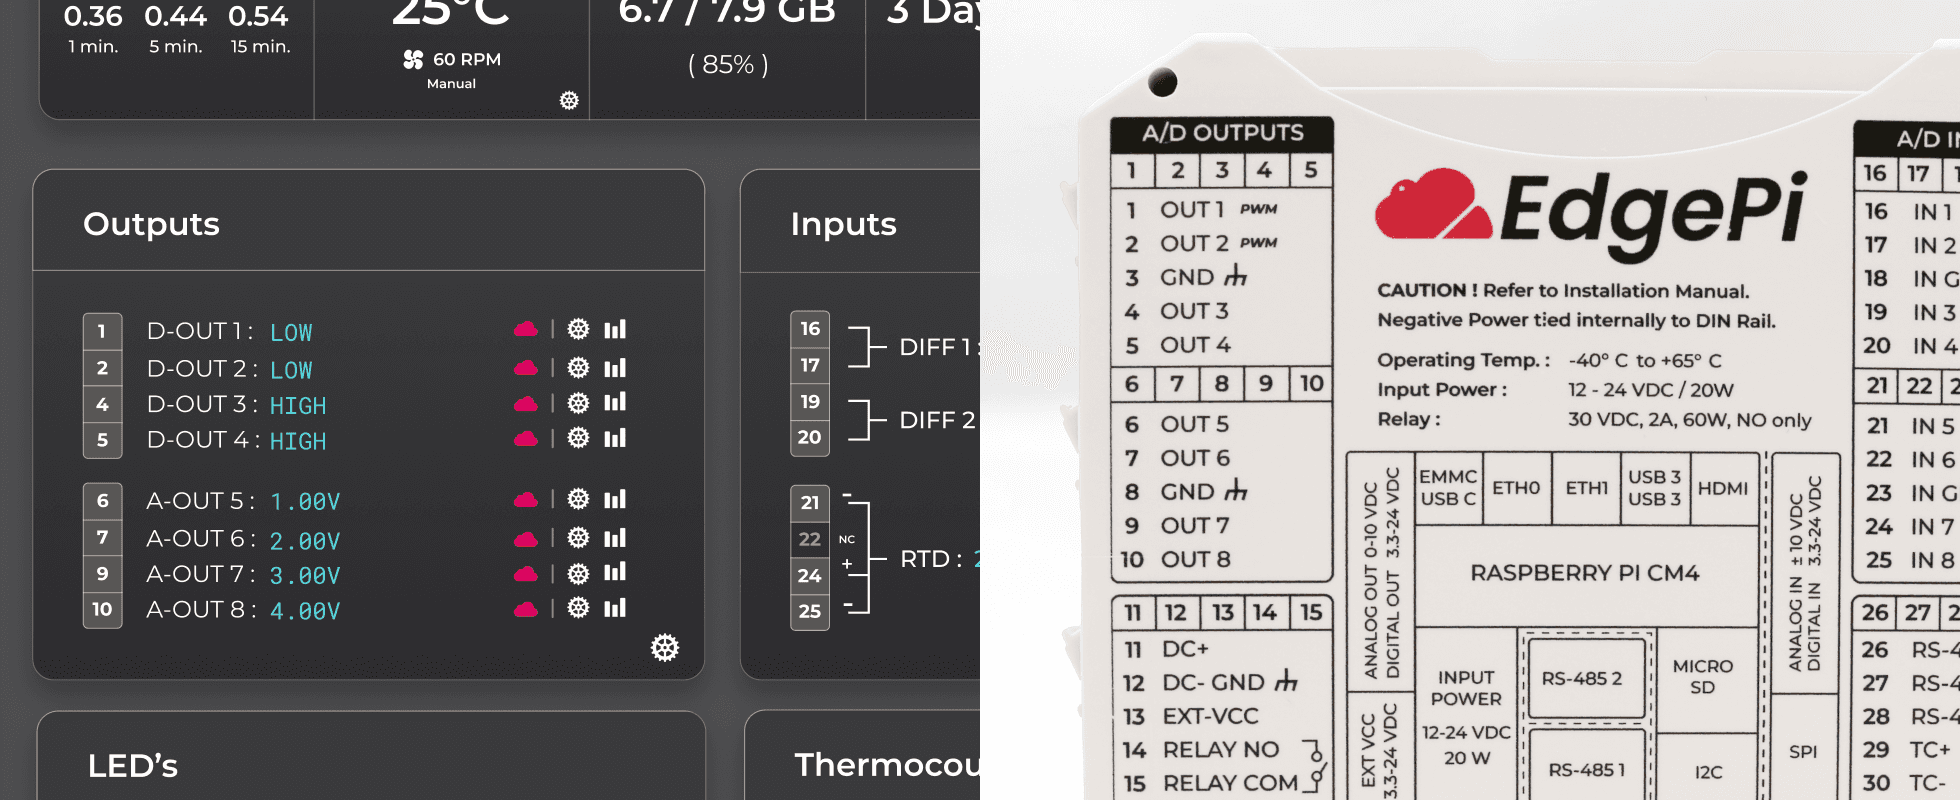
Utilizing natural mapping to achieve an internal consistency among touch-points
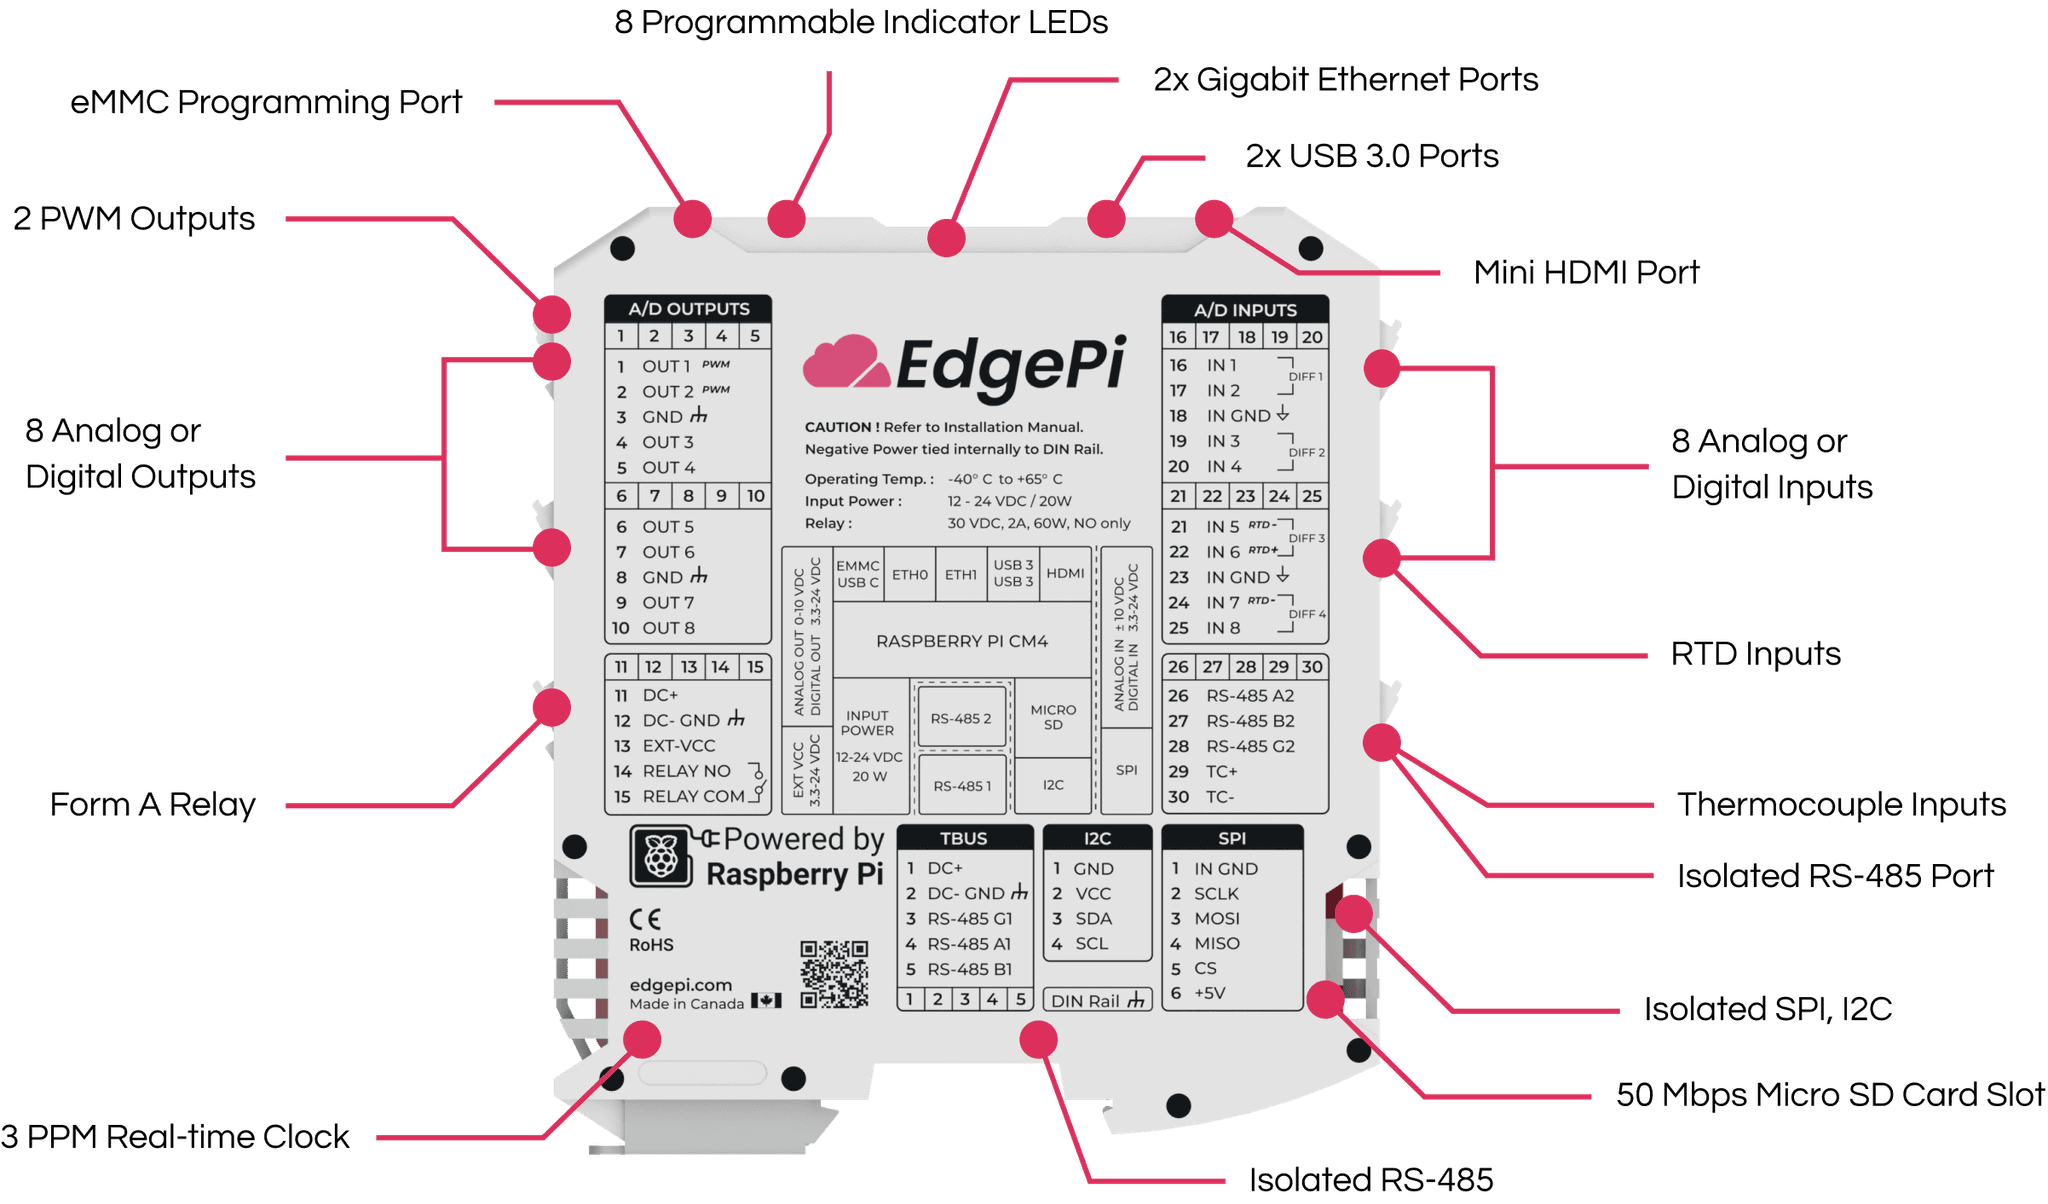
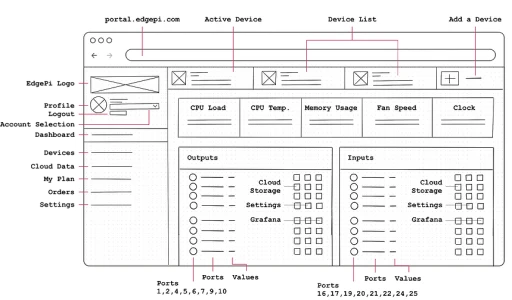
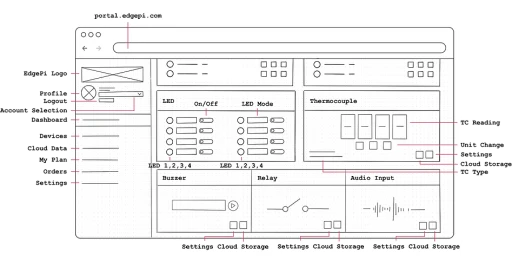
Cards presents the ports numerically, and in chronological order, following the layout of ports shown on the enclosure and on the device. By presenting ports in a similar fashion to how it is presented on the physical enclosure, I established internal consistency to increase intuitivity.
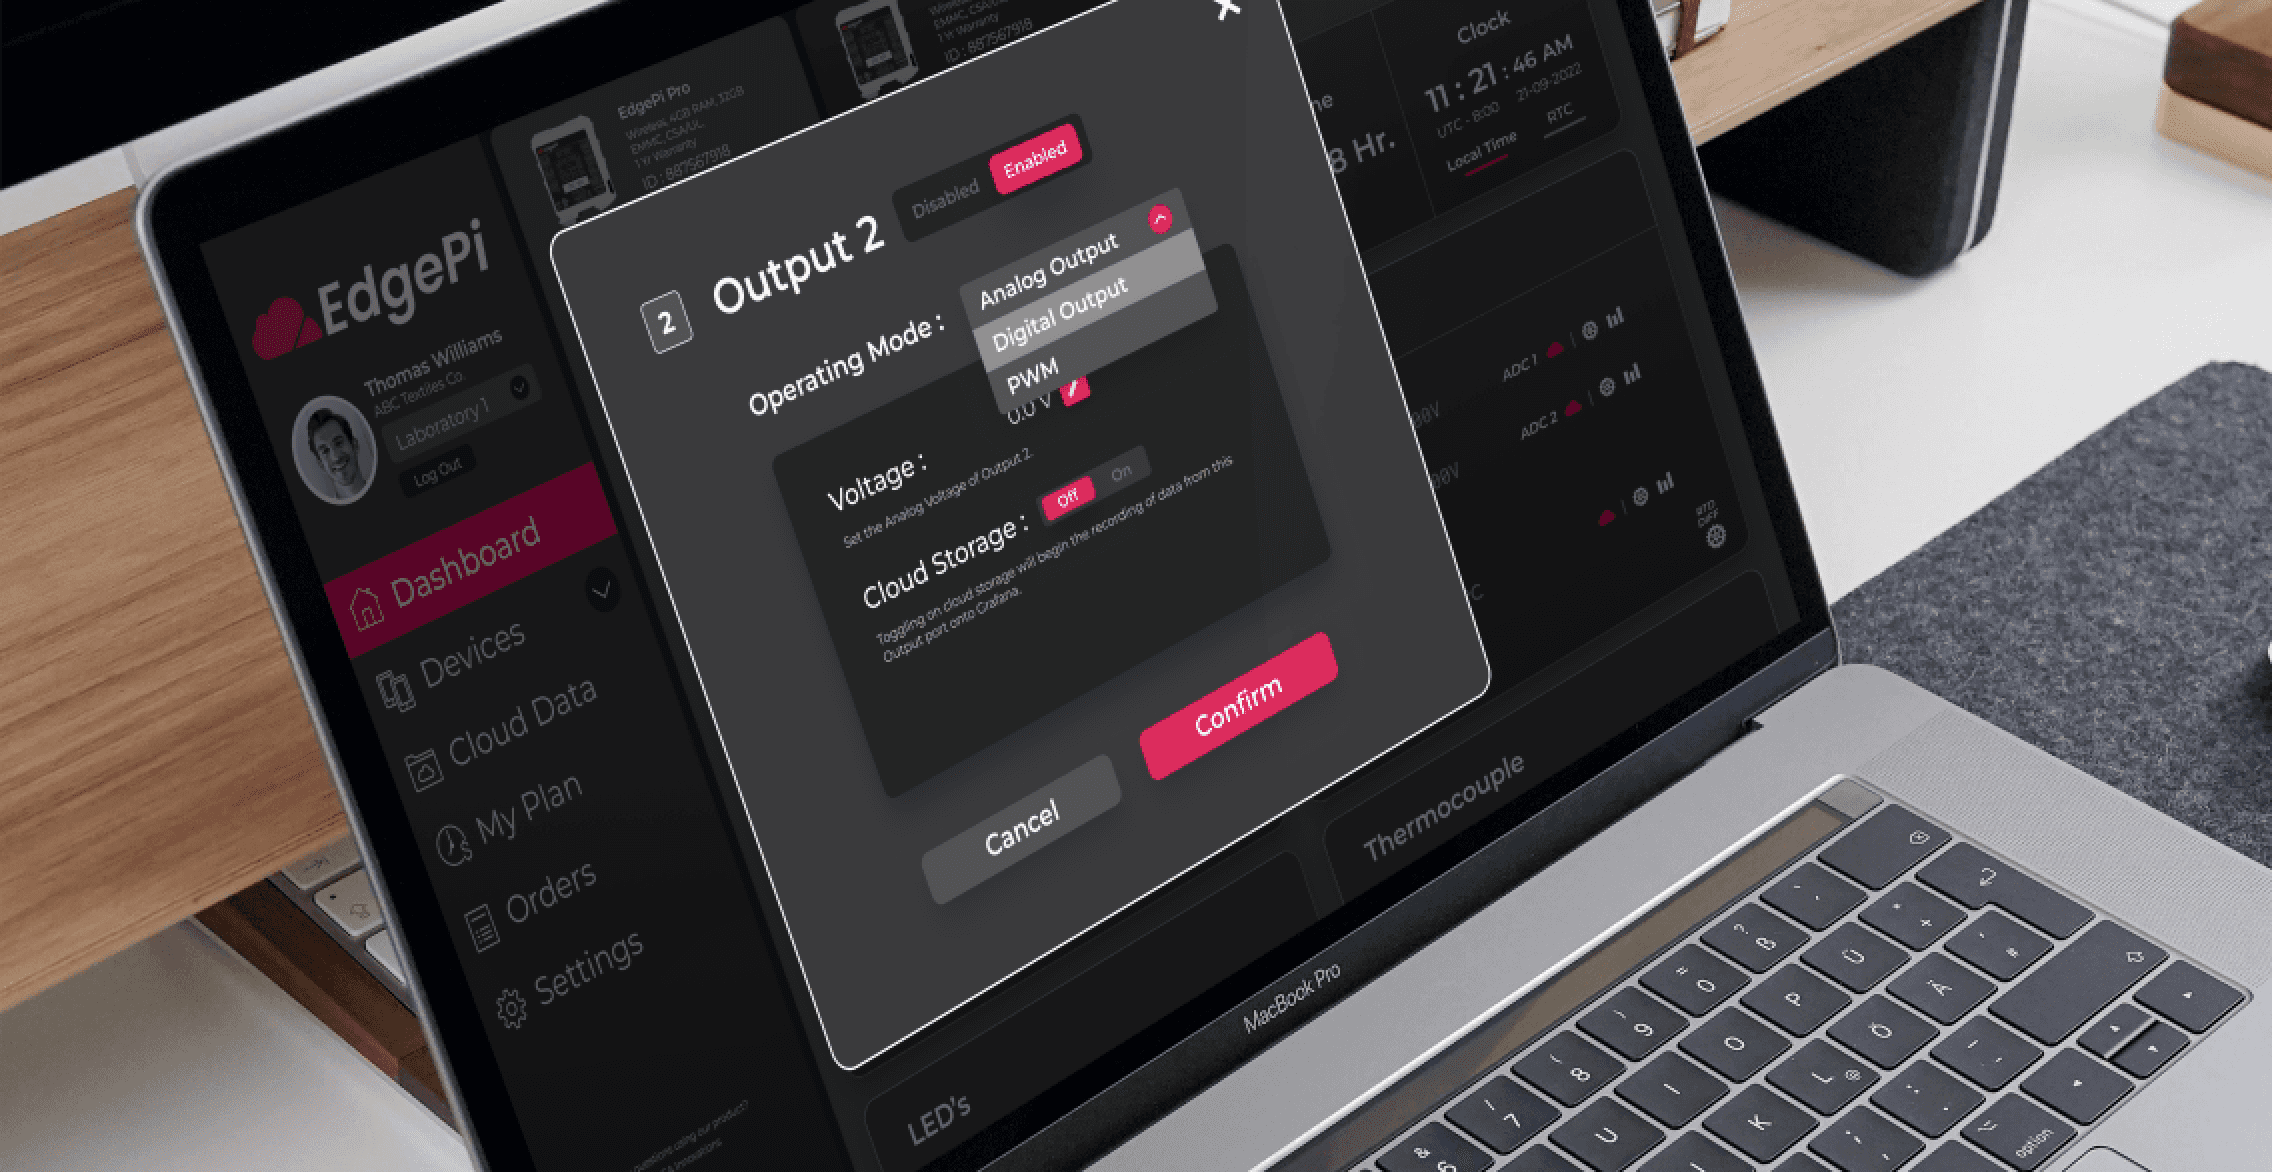
Managing complexity using progressive disclosure
Module configurations are placed within each card’s settings, displayed as modals. These more complex options are presented to users in time and when needed.
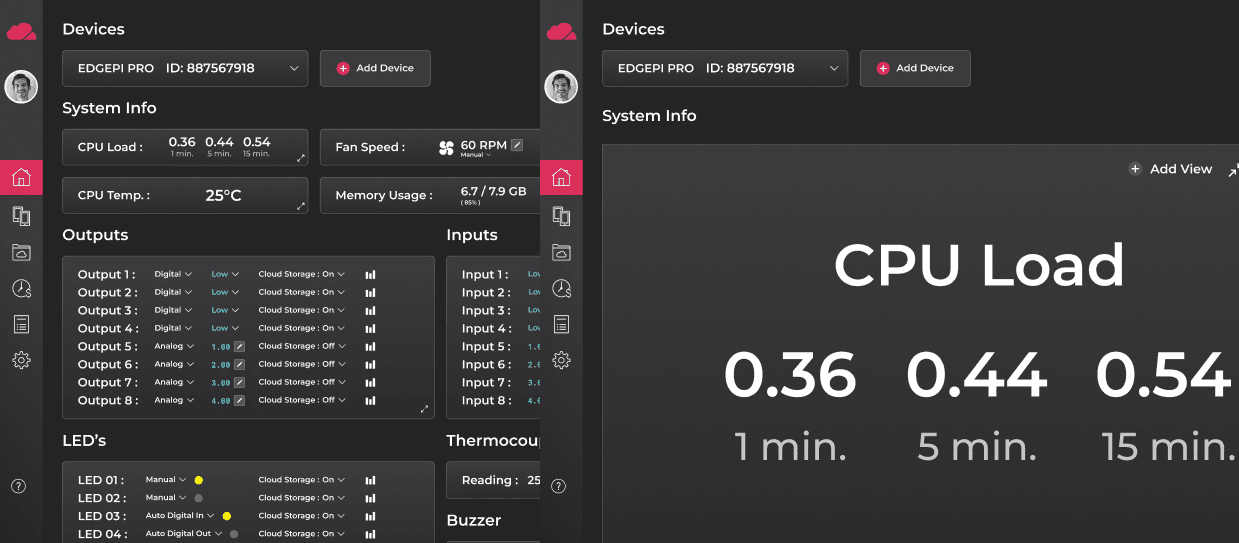
Tailoring the user experience for the more advanced user
Catering to the industrial use case of EdgePi, users have the option to view EdgePi Portal through a compact mode. Instructional content is replaced with additional accelerators, personalizations, and customizations, to streamline workflow for the more advanced user.
Plug-and-Play right out of the box.
Begin configuring in minutes.
Plug-and-Play right out of the box. Begin configuring in minutes.
Plug-and-Play right out of the box. Begin configuring in minutes.
After subscribing to a subscription data plan, users can add their EdgePi by scanning the unique QR Code located on the device's enclosure and then attaching it to a prepaid data plan.
After subscribing to a subscription data plan, users can add their EdgePi by scanning the unique QR Code located on the device's enclosure and then attaching it to a prepaid data plan.
Designed with Intuitiveness in Mind, utilizing Natural Mapping & Progressive Disclosure
Designed with Intuitiveness in Mind, utilizing Natural Mapping & Progressive Disclosure
Designed with Intuitiveness in Mind, utilizing Natural Mapping & Progressive Disclosure
EdgePi's modules are shown as cards on the dashboard, with each port displayed identically to how it is shown on the enclosure label. Configurations are placed within modals, only presented when needed.
EdgePi's modules are shown as cards on the dashboard, with each port displayed identically to how it is shown on the enclosure label. Configurations are placed within modals, only presented when needed.
A Centralized Hub for all things EdgePi.
A Centralized Hub for all things EdgePi.
A Centralized Hub for all things EdgePi.
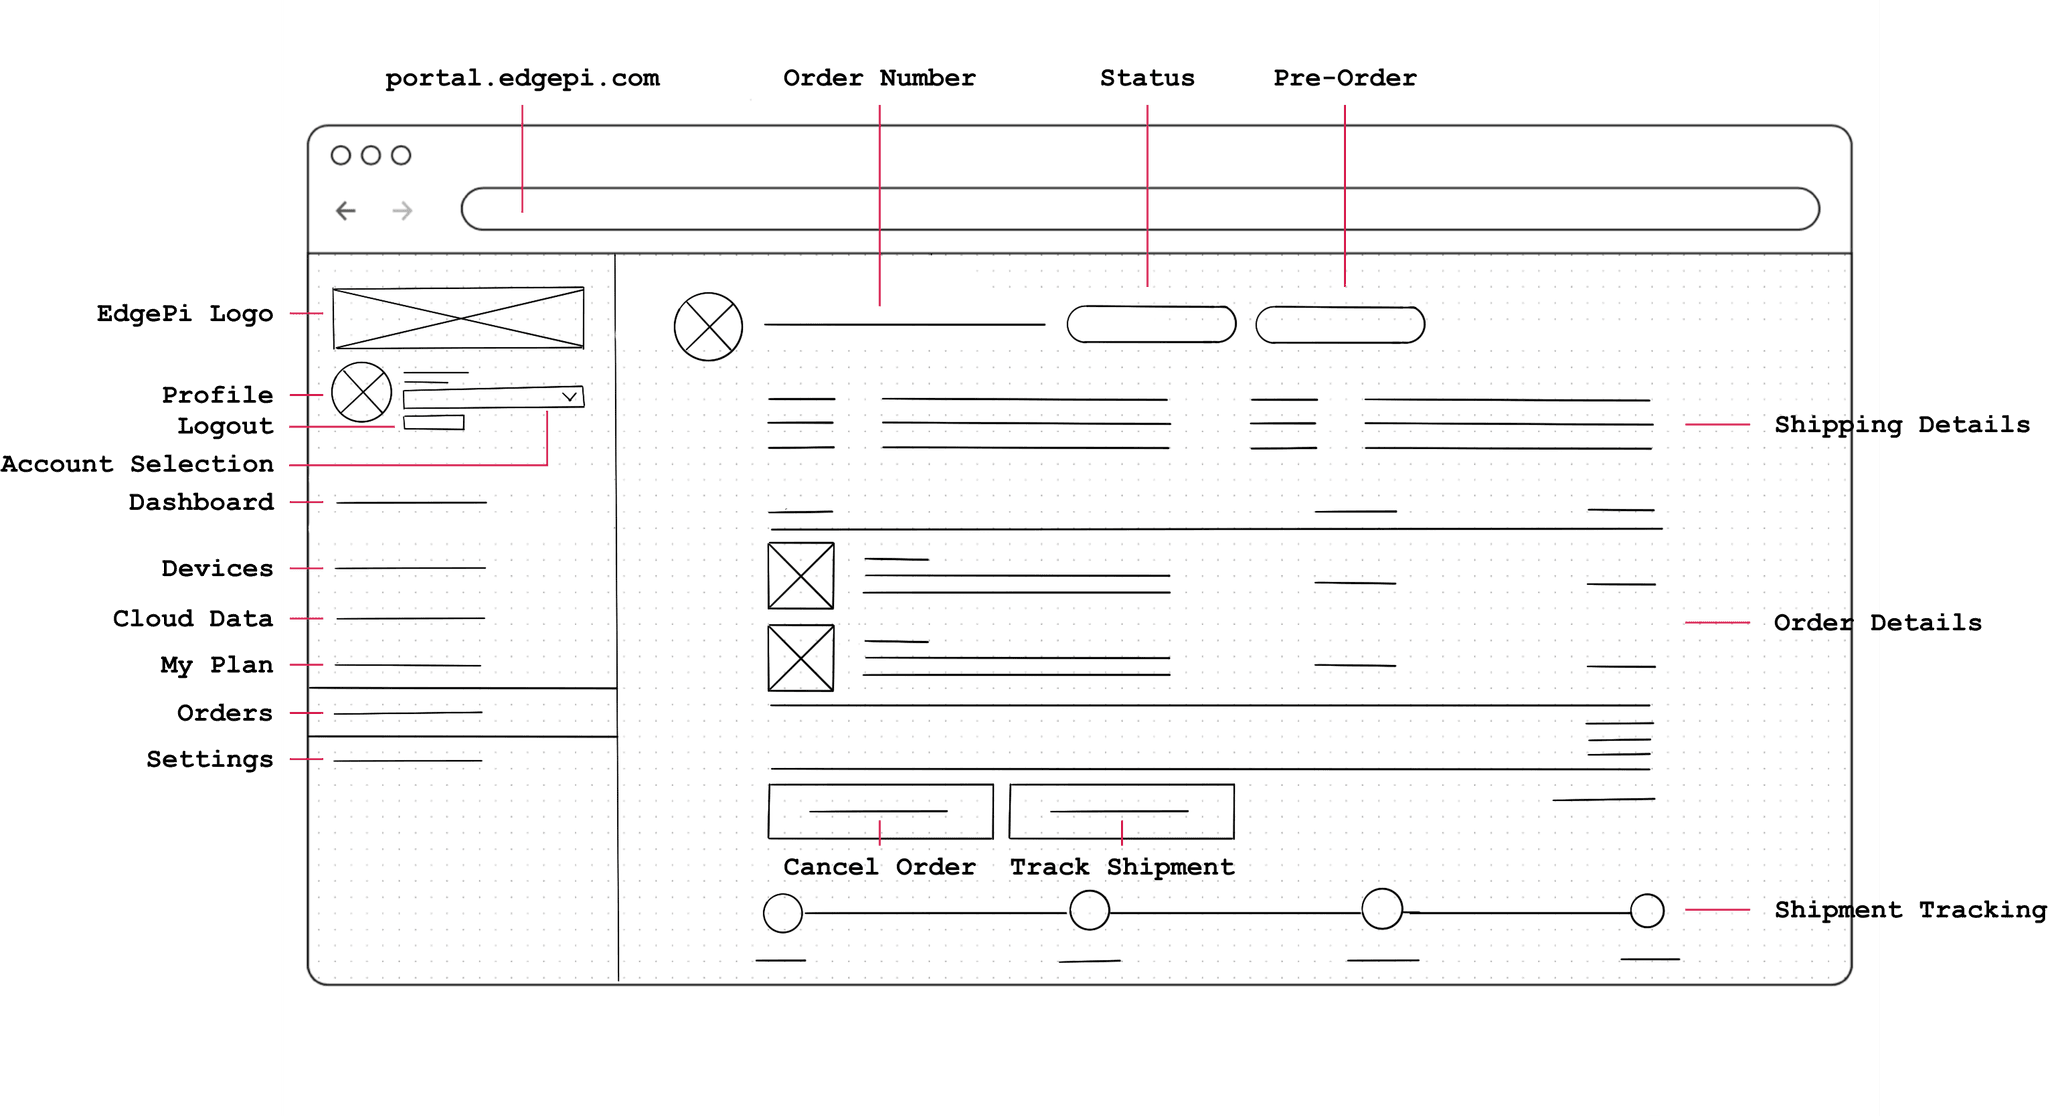
Users can manage all aspects related to their EdgePi Devices through the EdgePi Portal, from attached devices, to subscriptions plans, to order history.
Users can manage all aspects related to their EdgePi Devices through the EdgePi Portal, from attached devices, to subscriptions plans, to order history.
IMPACT
My Contribution.
Led the end-to-end experience for EdgePi Portal as the sole designer. Saw the portal from ideation, to MVP Testing with community users, to its ultimate release.
Instilled a design culture within the organization by conducting collaborative co-design ideation sessions in order to familiarize stakeholders with the design process and its methods.
Created an EdgePi design system to ensure long-term scalability of the platform, and consistent branding throughout EdgePi's many marketing touch-points including its marketing website, web storefront, packaging and other branding designs shipped by me.
01 /
DESIGN ETHNOGRAPHY
Stakeholder Interviews / Site Visit / Competitive Analysis
EdgePi was a complicated industrial PC with both hardware and software elements that required specific technical knowledge that I did not possess. At the beginning, it was important for me to spend some time understanding the context of the product before I head into ideation.
01.1 Understanding the ask from the stakeholders
Primary phase of my user research involved inquiring about EdgePi as an Industrial PC, expectations for the interface from the team, and possible pain points that may arise.
OSENSA Innovations
Chief Technological Officer
Gathered insight into the capabilities of EdgePi, the context of the problem, and the functionalities the portal must possess.
“The EdgePi Portal is what sets our Raspberry Pi Powered industrial PC from our competitors. A good balance will have to be struck between the inherent complexity of an industrial PC and learnability of our portal interface in order to cater to our broad target audience.”
OSENSA Innovations
Back-end Developer
Gathered insight into the development logic that the EdgePi Portal UI will use in order to control the EdgePi device remotely.
“We will be primarily using AWS IoT Device Shadow Service to control the device. The EdgePi Portal interface should present the state of each configuration on the EdgePi and have input controls for users to change those said states.”
OSENSA Innovations
Front-end Developer
Gathered insight into how the portal interface would be implemented and any constraints or feasibility issues that may arise.
“The EdgePi Portal interface would be coded using ReactJS and Chakra UI. Both of these programs have component libraries that could be used in the design to make my life easier, although new design elements can also be created if needed.”
OSENSA Innovations
Back-end Developer
Gathered insight into the hardware anatomy of an EdgePi device such as its ports, microchips and boards.
“EdgePi in summary is a cloud integrated industrial PC, PLC (Programmable Logic Controller), and IoT edge device, with multiple channels of input and outputs. Most of the ports will have to be configured somehow using the portal.”
01.2 Immersing myself into EdgePi's real-world use case
Secondary Phase of my user research involved scheduling a walkthrough with a mechatronics engineer to walkthrough the real-world use cases of EdgePi.
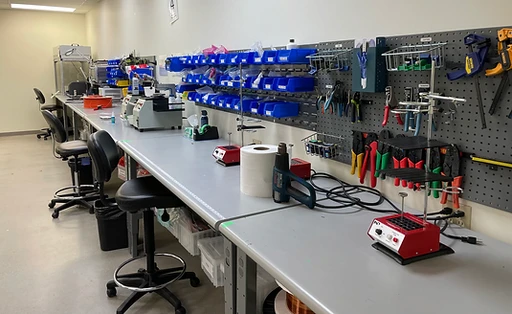
Understanding EdgePi is still a work-in-progress
Visited the in-house cleanroom where the first batch of EdgePi's are being built. Prototypes are currently undergoing QA and QC testing before full production.
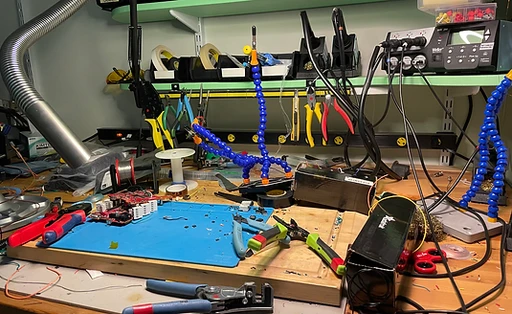
Understanding EdgePi in a Home and School setting.
Visited a mechatronic's workspace where different breadboard setups were being set up, imitating what it would look for hobbyists and students using EdgePi.
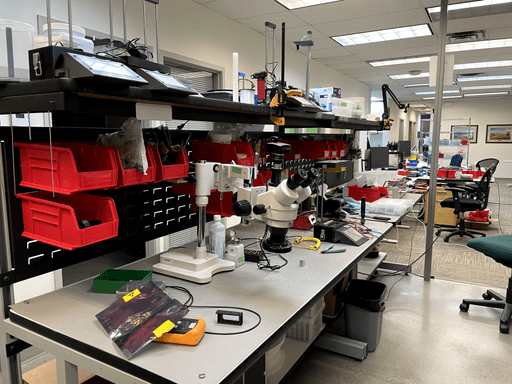
Understanding EdgePi in an Industrial Automation setting.
Visited the mechatronic lab where different boards were being tested to cater towards professionals using EdgePi in an industrial setting such as factory automation.
01.3 Learning from what's out there already
Final phase of my user research comprised of gaining an understanding of existing related products in the market in order to gauge EdgePi's strength and weaknesses.
EdgePi was a complicated industrial PC with both hardware and software elements that required specific technical knowledge that I did not possess. At the beginning, it was important for me to spend some time understanding the context of the product before I head into ideation.
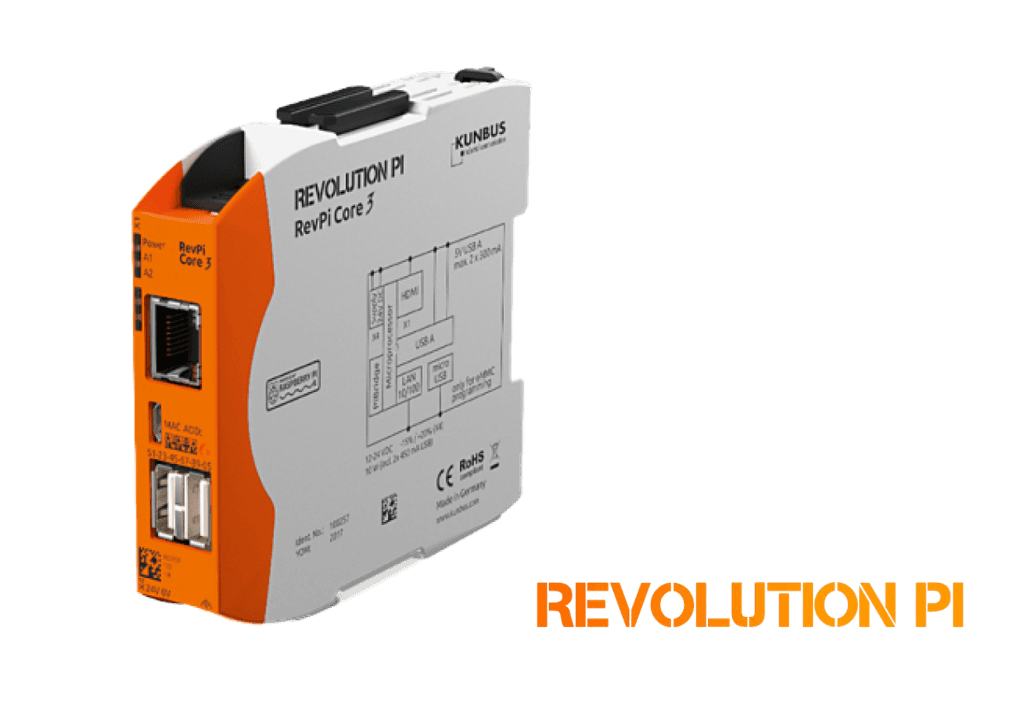
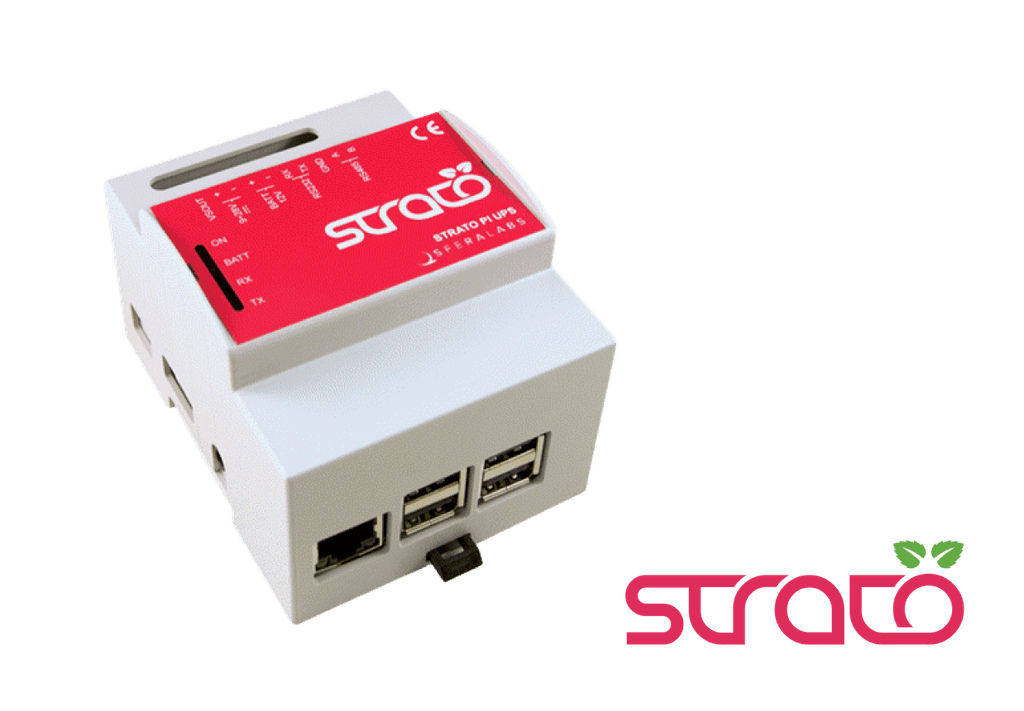
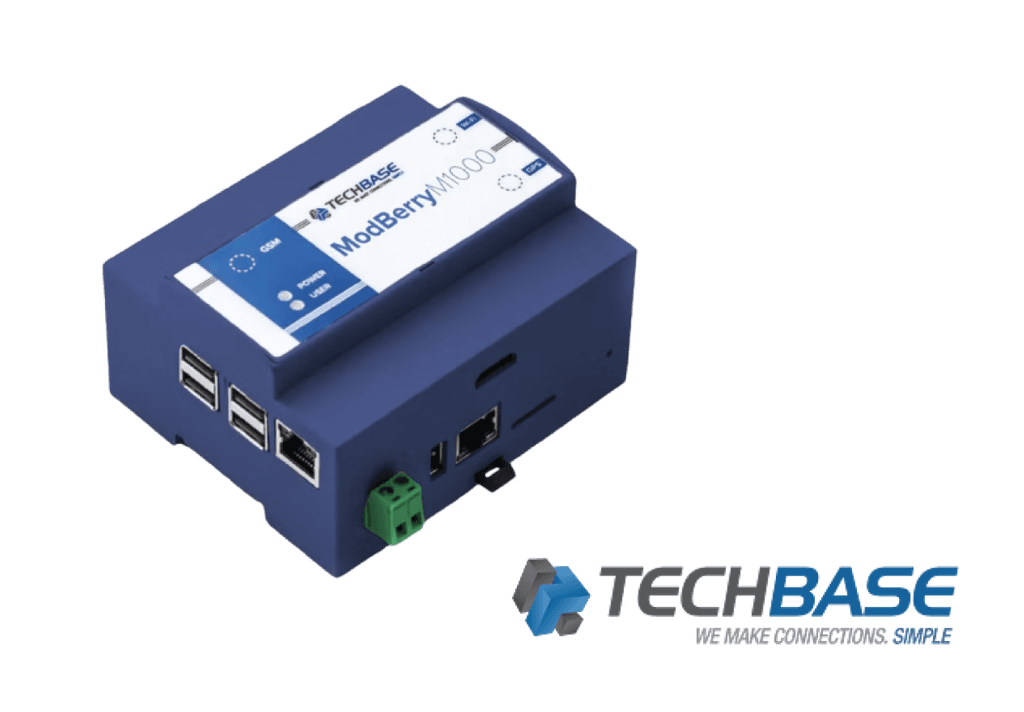
The competition is heavily geared towards industrial applications and does not cater at all to the hobbyist/student demographic. Their proprietary interfaces prioritizes function over form and can be intimidating and difficult to comprehend for beginners.
I realized that there was no shortage of companies creating Raspberry Pi Powered devices for industrial solutions. However what sets EdgePi apart from its competitors was its cloud capabilities and its intuitive, beginner friendly user interface accomplished through the EdgePi Portal.
02 /
DEFINING THE PROBLEM
Affinity Mapping / User Personas / User Journey
After consolidating my data gathered from the design ethnography stage, I chose to go into the define phase of the design process collaboratively with the team at OSENSA in order to familiarize the team that is relatively new to the field of interaction design to its methods, and to gain critical feedback early onbased on my colleague's expertise.
02.1 Co-design sessions to bring the conversation to the larger group
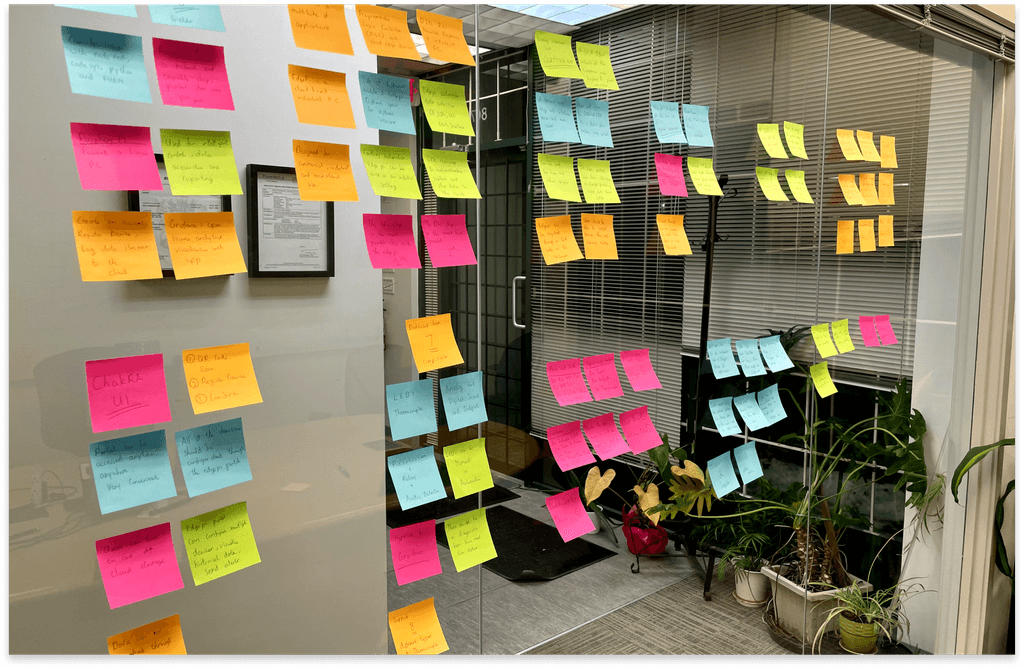
During the define phase, I created a physical affinity map to encourage my coworkers to join in on the conversation and help form insights and brainstorm ideas collaboratively.
The affinity mapping helped me organize the extremely diverse information from different stakeholders gathered from the design ethnography into a coherent and meaningful presentation. After the map was set up, some recurring themes and patterns began to appear.
02.2 Turning stakeholder defined target audiences into personas
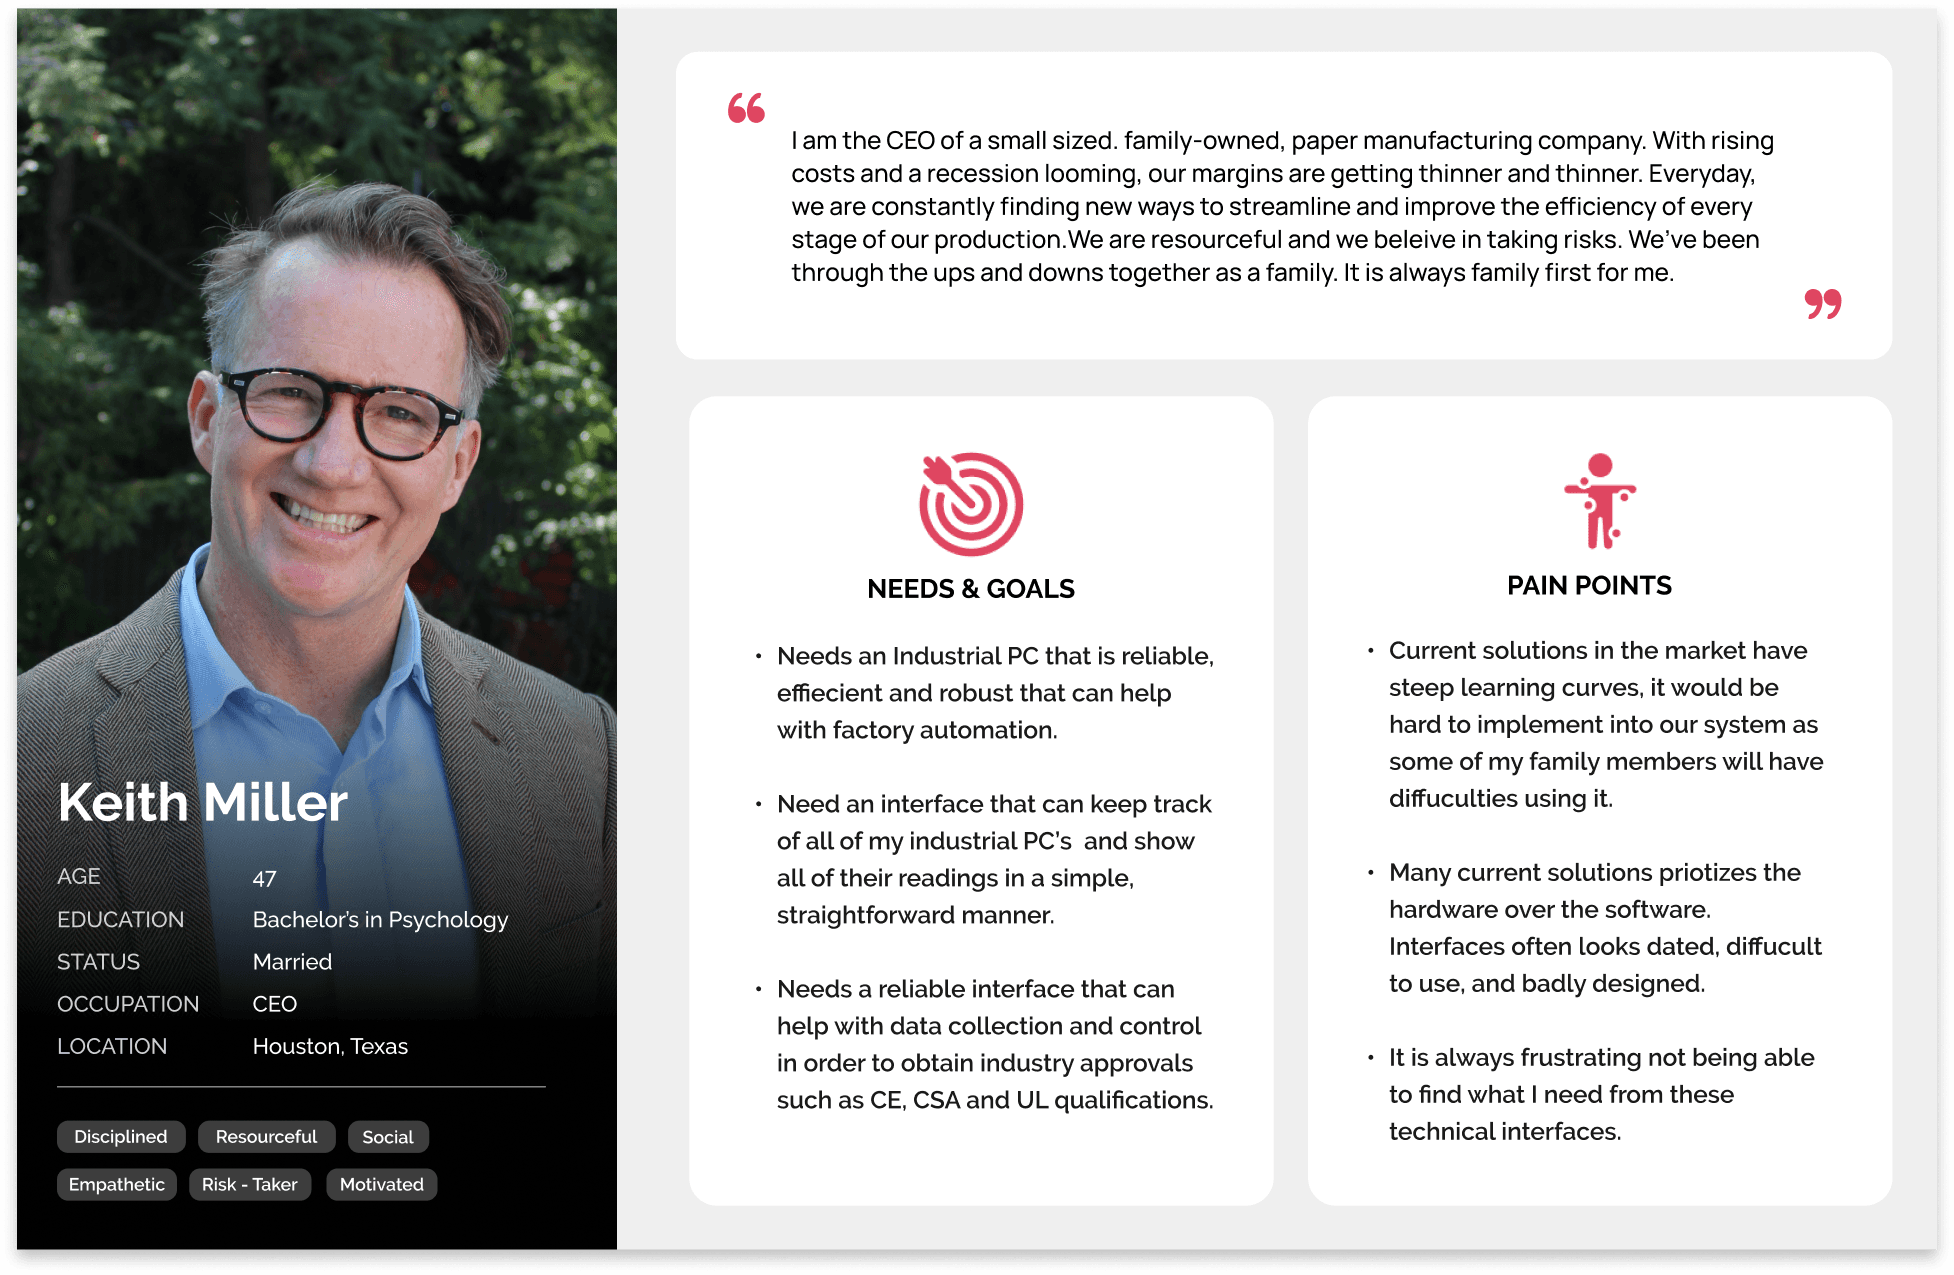
EdgePi's 2 main target audiences were then presented as user persona archetypes, a mechatronics university student that regularly conducts personal electronic projects at home as a hobby, and a CEO looking for an cloud-based industrial PC to aid in factory automation.
These 2 archetypes was extremely useful in helping me ground my design and made sure I was cognizant of my user's diverse goals, preferences, and pain points. Often during setbacks that required design iterations, I would often go back to my personas to remind myself who I was designing for.

02.3 Visualizing the complete customer onboarding journey
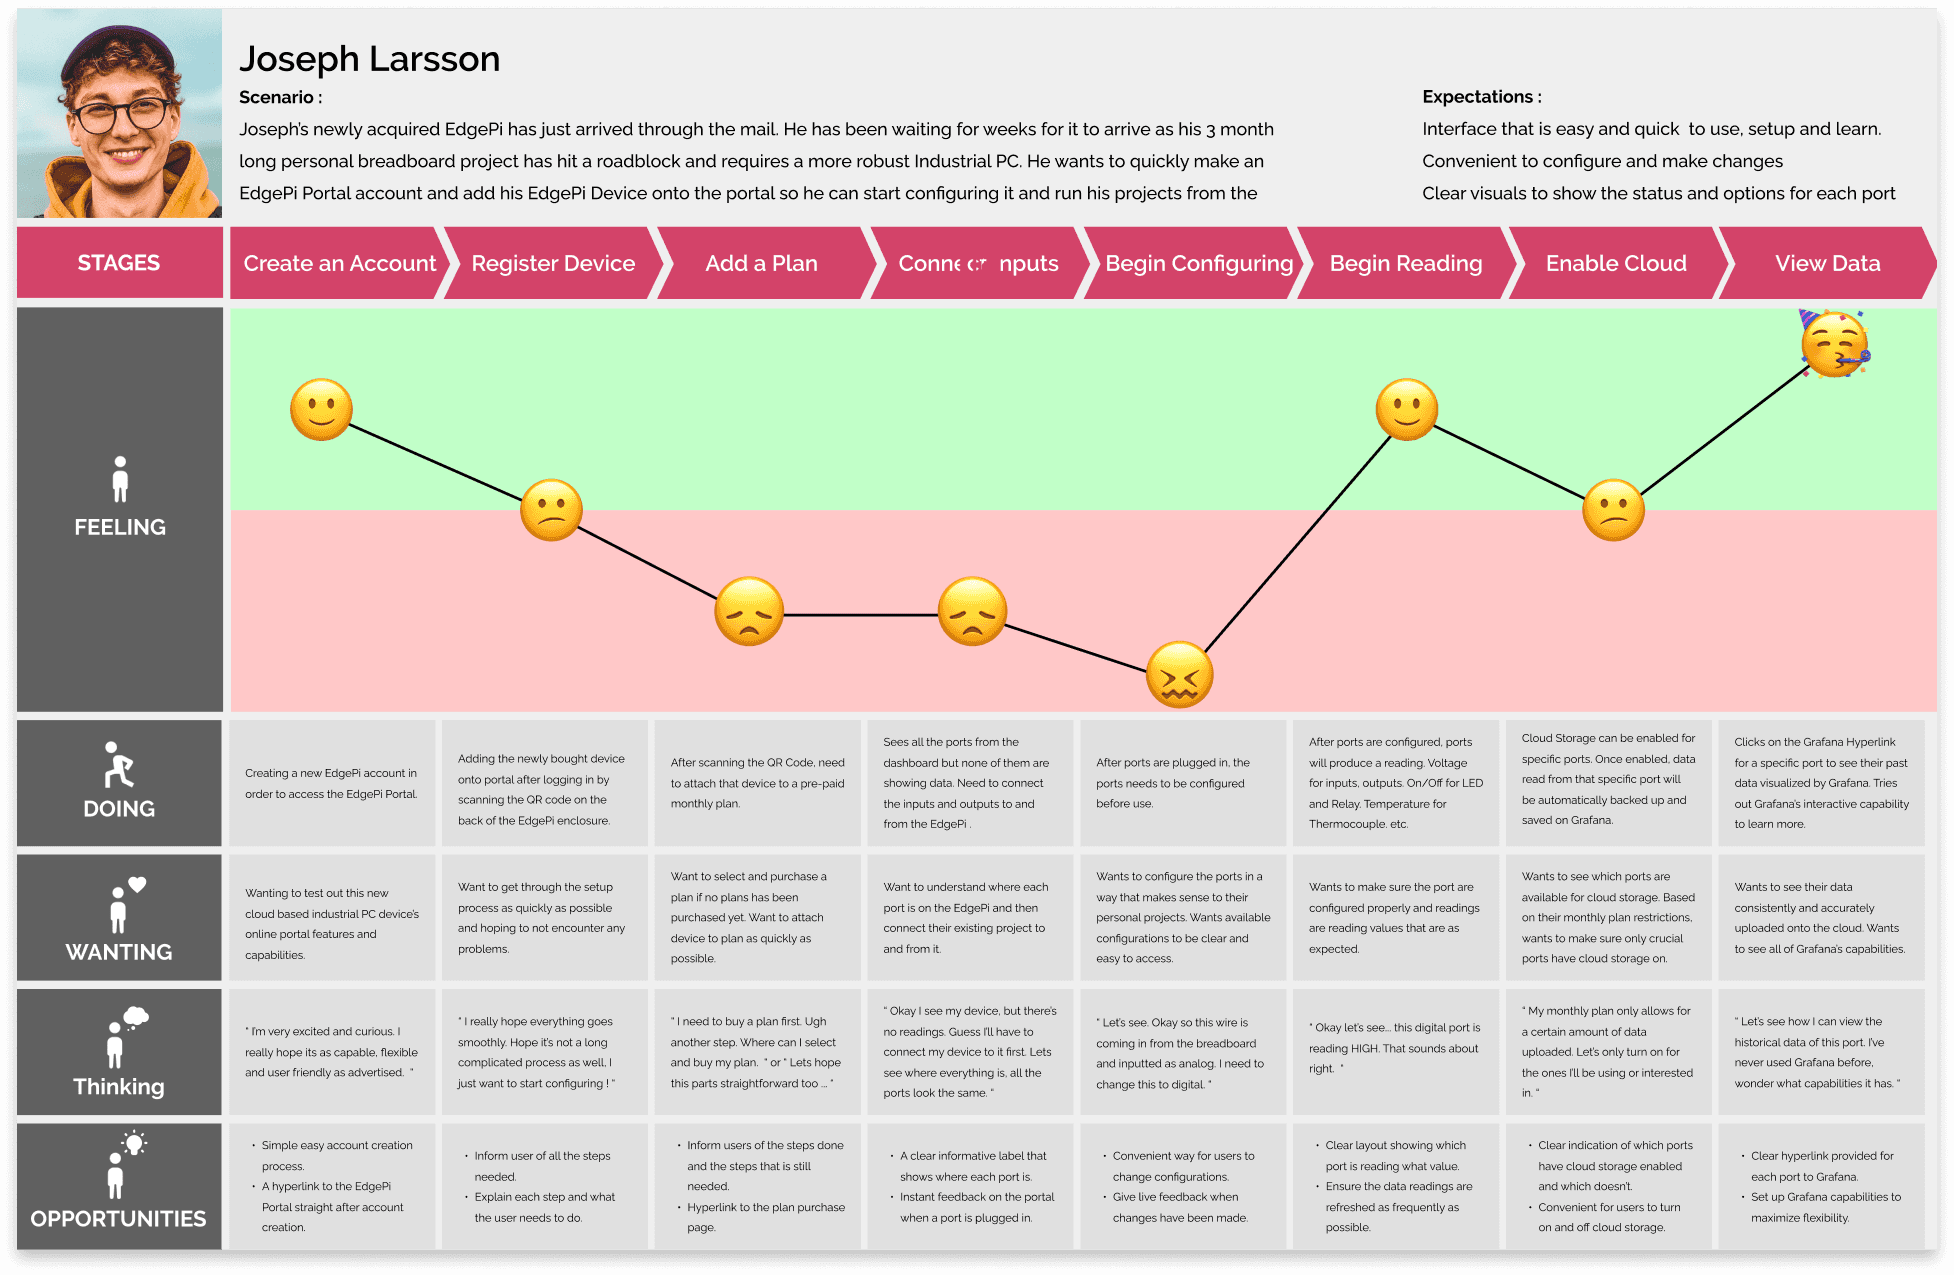
Lastly, I created a journey map to create a visualization of the many processes and steps the user would go through when interacting with the EdgePi Portal. Each step of the map gave me potential areas of improvement as well as insight into steps that required a higher mental load from users.
The actor and POV of the journey map was one of my user personas. Unfortunately the data to inform the creation of the journey map was not 100% based on real data as I did not have the opportunity to interview a mechatronic student /hobbyist. I instead used the data that I've received from the in-house user interviews, field studies, and competitive analysis and try my best to link it to an individual from this user archetype.
03 /
IDEATION + PIVOT
Initial Ideation / The Pivot / Sketches
03.1 Incorpoating feedback into rapid ideation in low fidelity
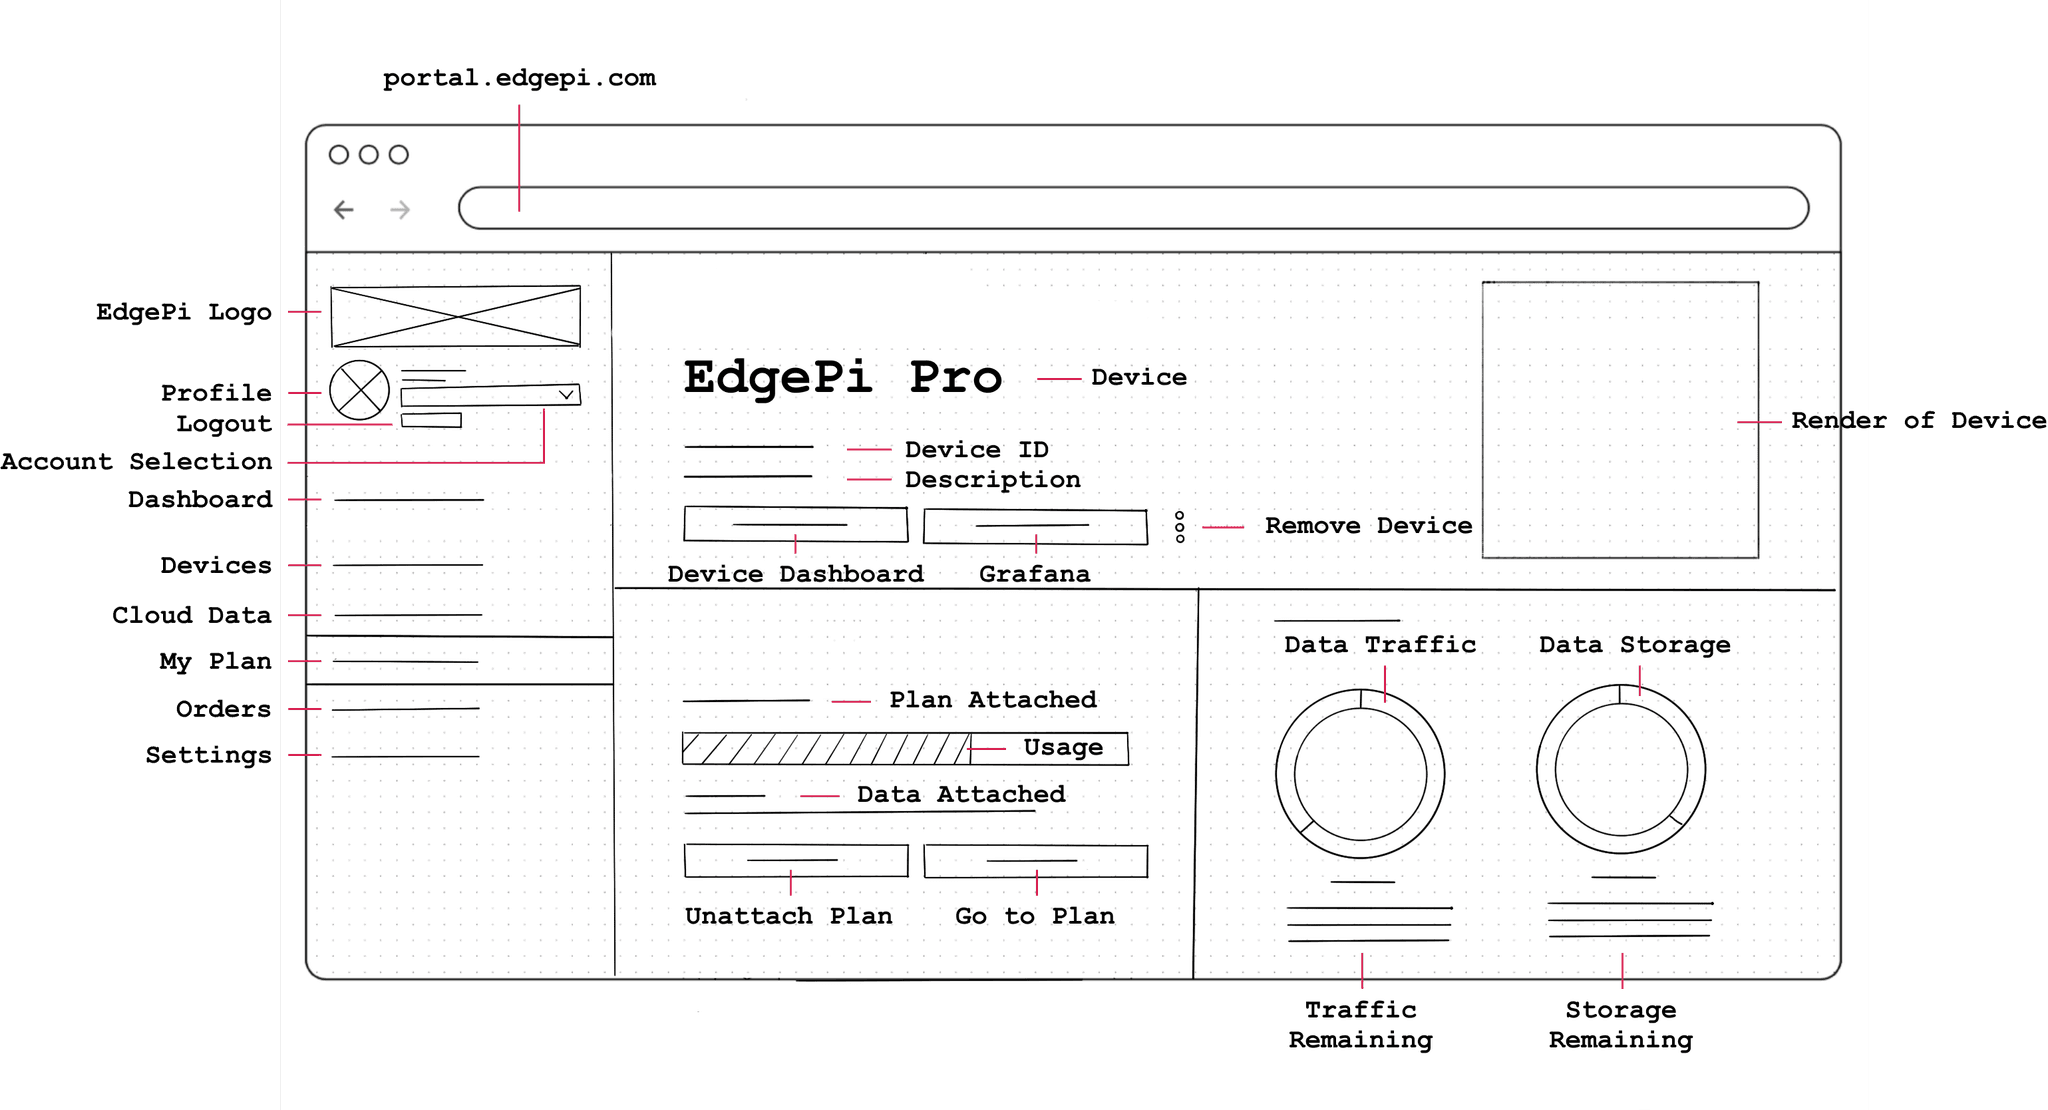
The ideation of the Dashboard was an iterative process and I went back and forth between sketching, wire-framing and creating low-fidelity designs on Figma.
As many hardware and software components of the EdgePi was still being worked on, there would often be times where my requirements would change or new functionalities or restrictions would be added at a moments notice, forcing me to modify existing ideas or brainstorm new ones.


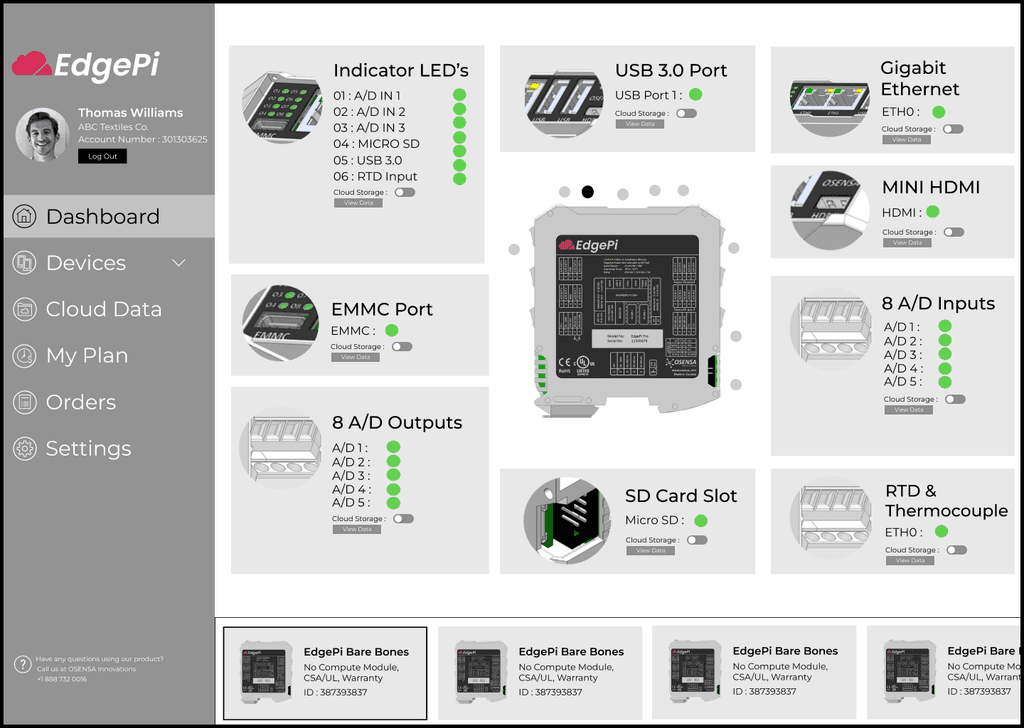
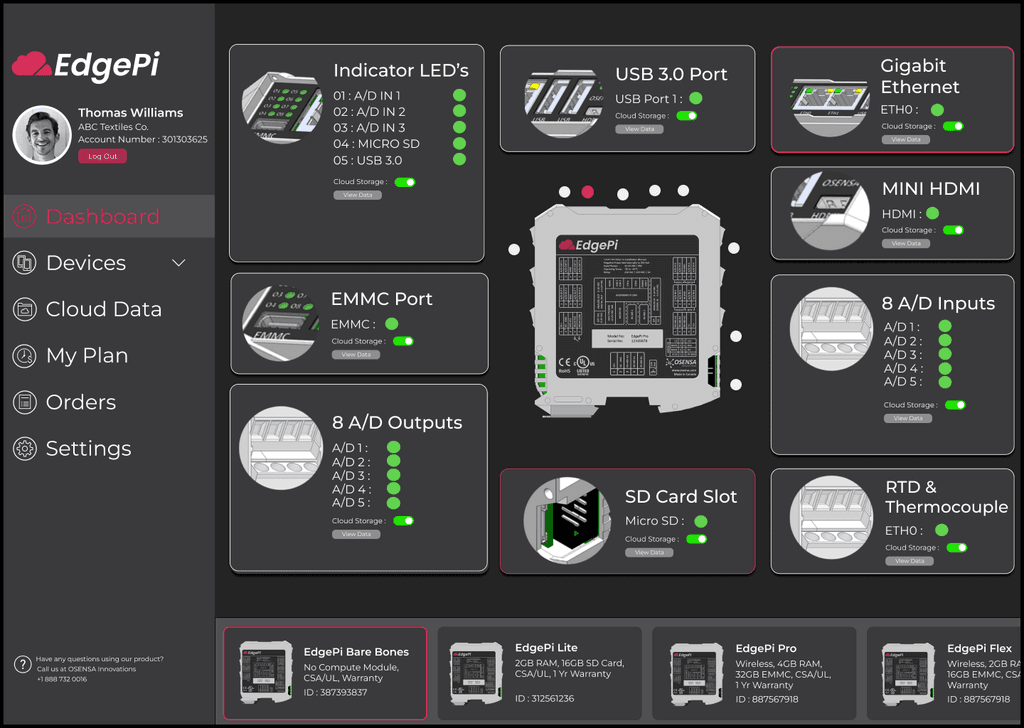
03.2 Uh oh. Here comes the pivot…
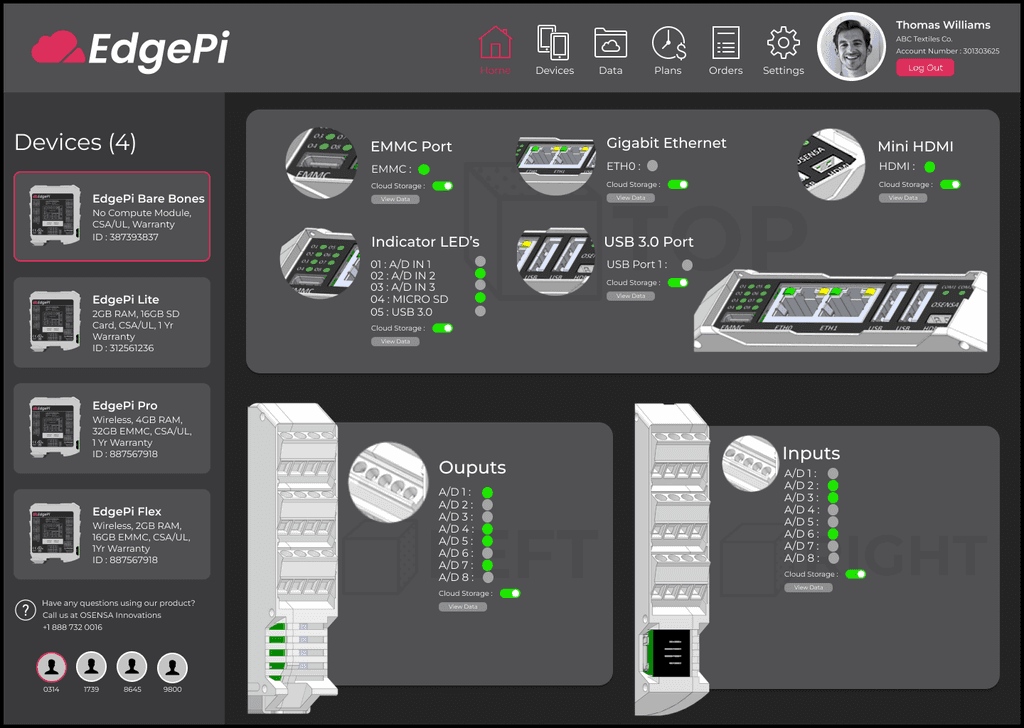
However as development of the EdgePi continued, with some major changes to the hardware of EdgePi, coupled with the software backend side learning more capabilities about the AWS IoT Device Shadow Service, EdgePi can now provide users with a lot more customizations to its functionalities through its portal than previously thought.
The portal originally thought to only control and store data from components as a module such as inputs, outputs, LED's, was later discovered that each individual port can now be manipulated by the user and have their data logged onto the cloud.
With the changes, I had to quickly pivot but soon realized that with the current ideation direction that there were simply too many configurations to have all actions on one screen.
I returned back to my affinity map and began modifying it to reflect some of the changes. I started brainstorming a design that incorporated the new functionality requirements while being mindful of EdgePi's target audiences as demonstrated by the 2 user personas created.
Reviewing the user journey, I began conceptualizing a Dashboard that was divided into View Mode and Edit Mode, in which the Dashboard will show the readings of each components and all configurations would be done through modal screens.
03.3 Back to the drawing board with another round of ideation
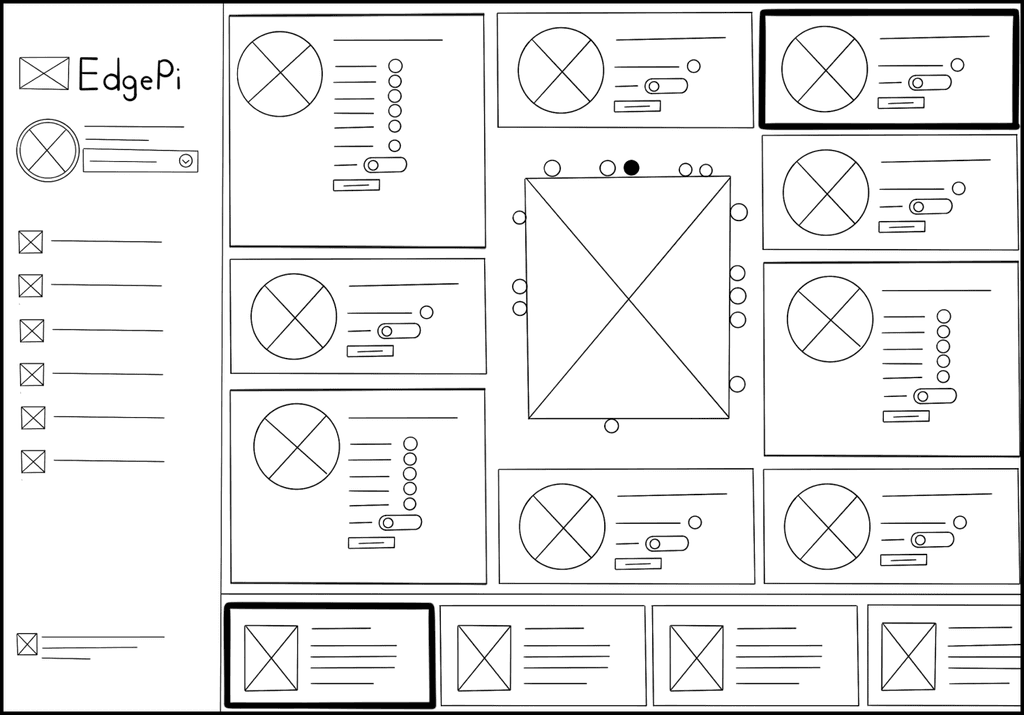
Learning from my previous mistake of increasing the fidelity of my interface ideations too quickly, I returned to the sketching phase to explore and iterate on various ideas.
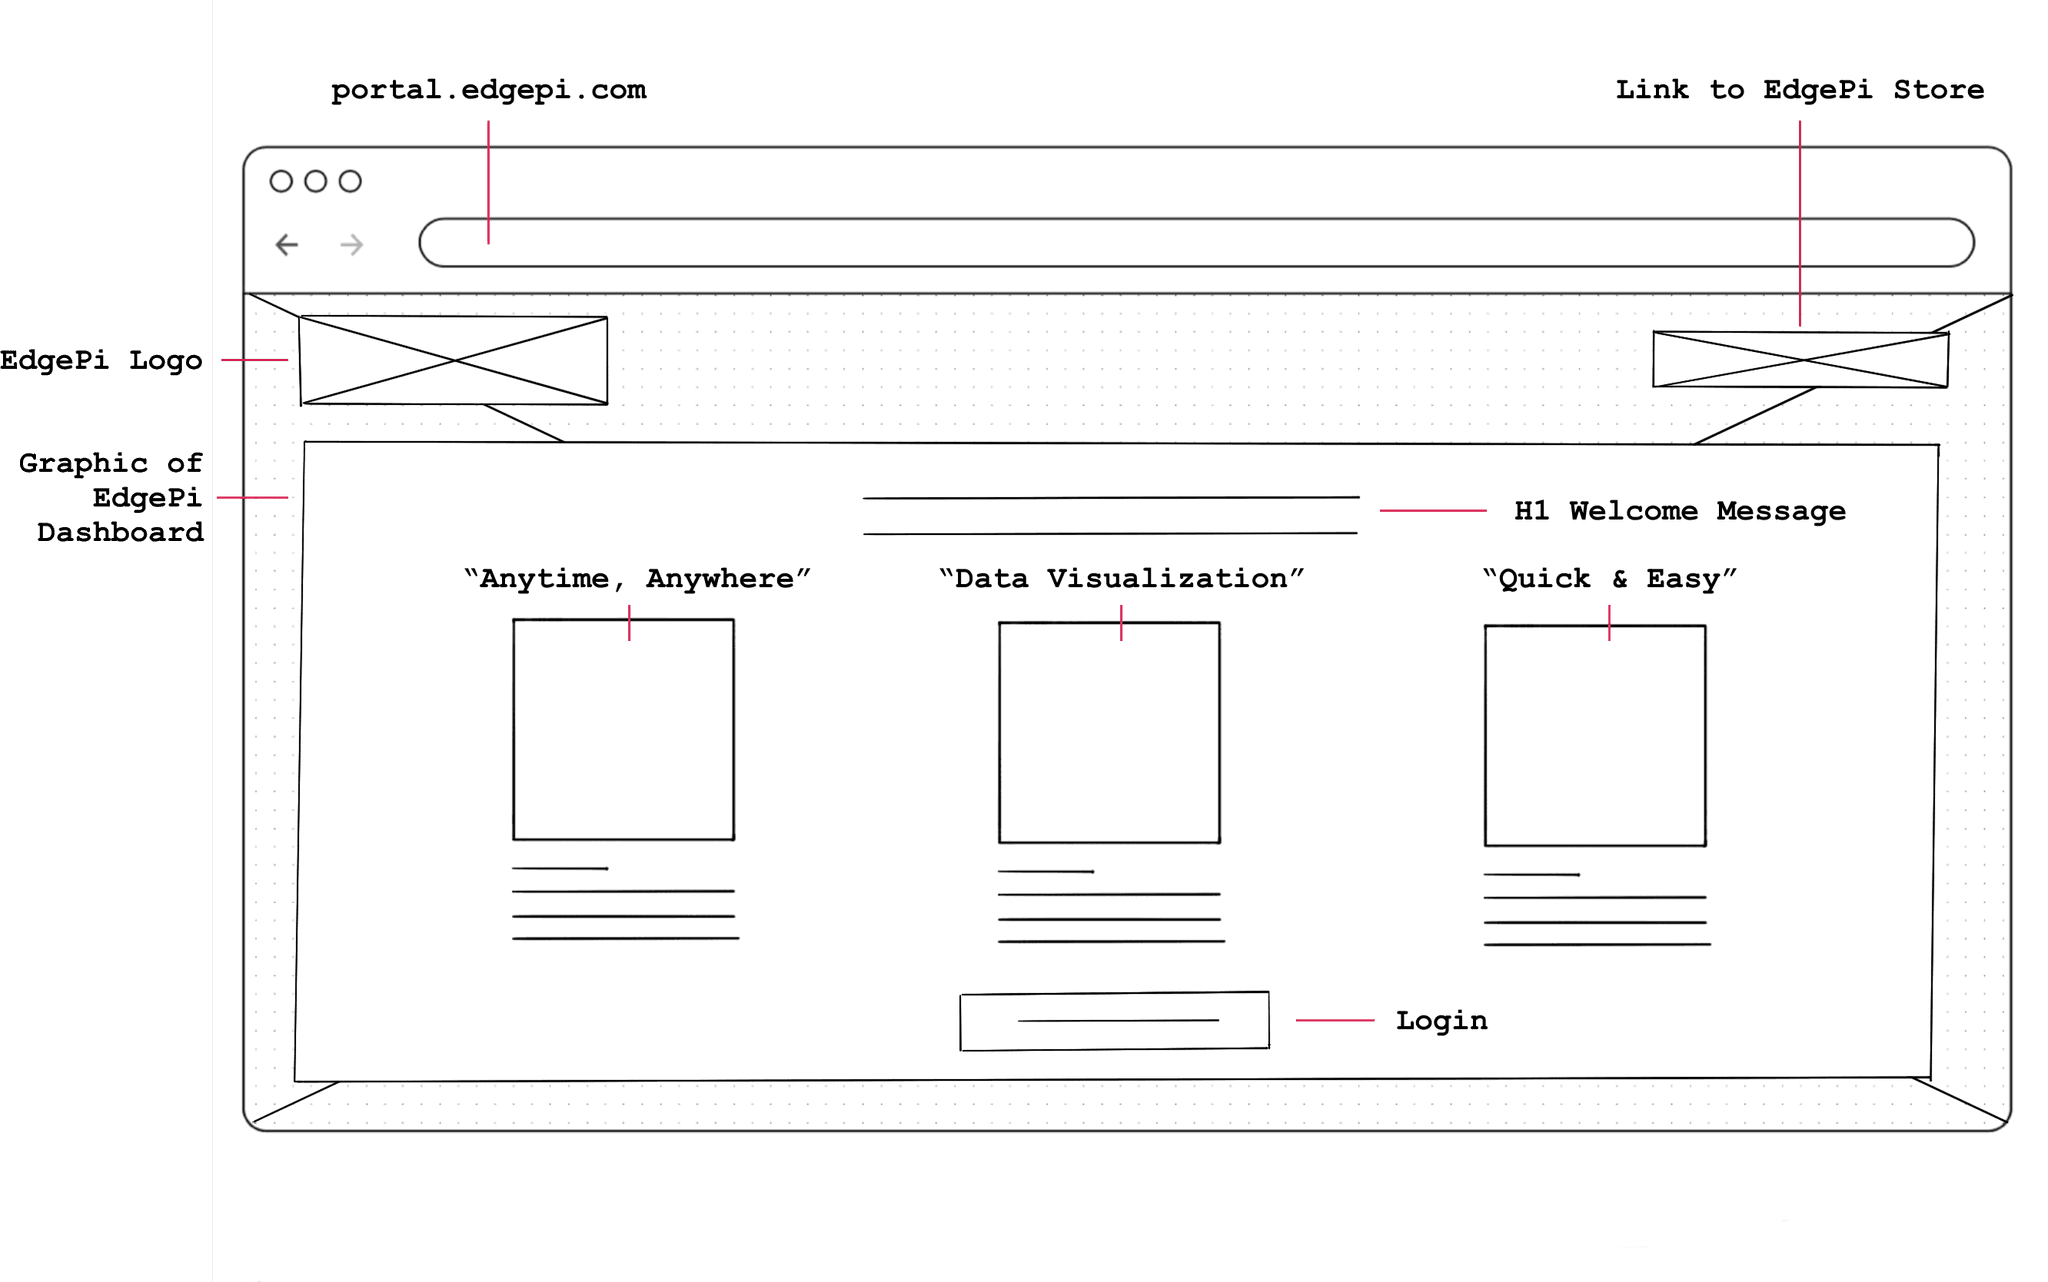
With low fidelity sketches, it provided a high level exploration of how the EdgePi portal user interface would work without getting bogged down by the details. I was able to quickly visualize different concepts and present it in meetings that aided collaboration and communication. Based on the feedback from the team, I would adjust and refine the sketches accordingly.
Add a Device
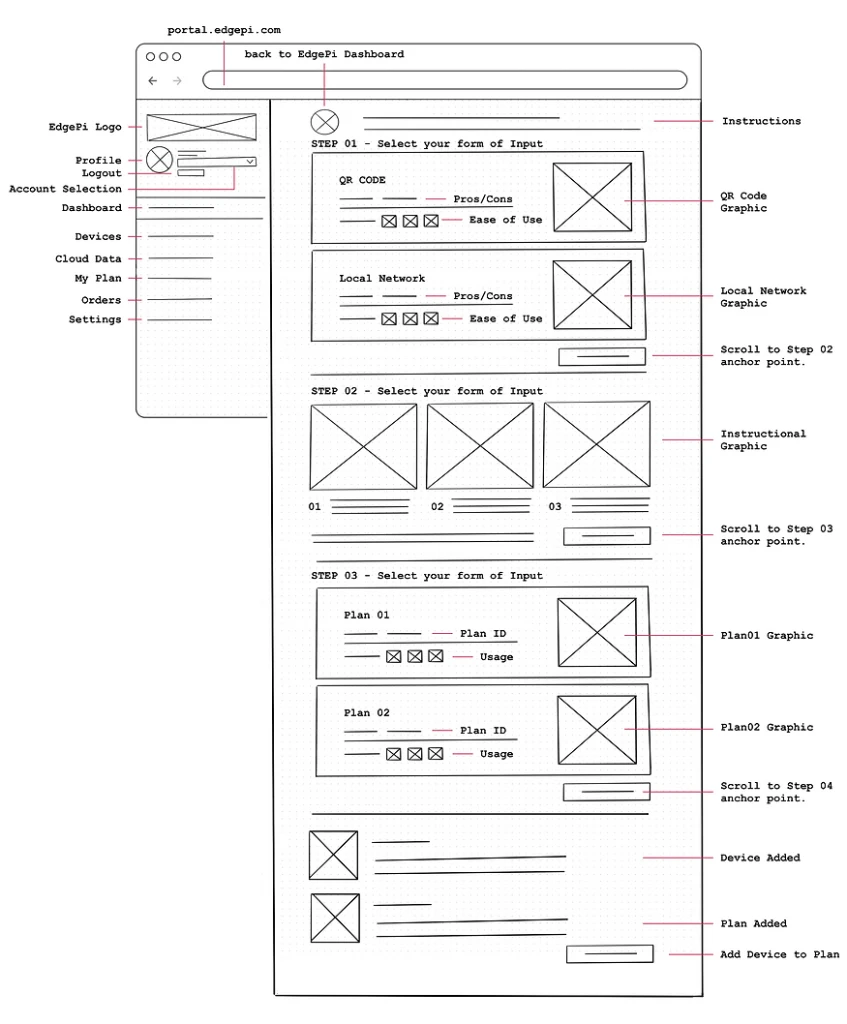
Dashboard
Portal Homepage
Dashboard Cont.
Order History
Device Overview

Subscription Plan
04 /
MVP User Testing
MVP Testing / Testing Feedback / Design Iterations
04.1 Getting the EdgePi MVP into the hands of the community
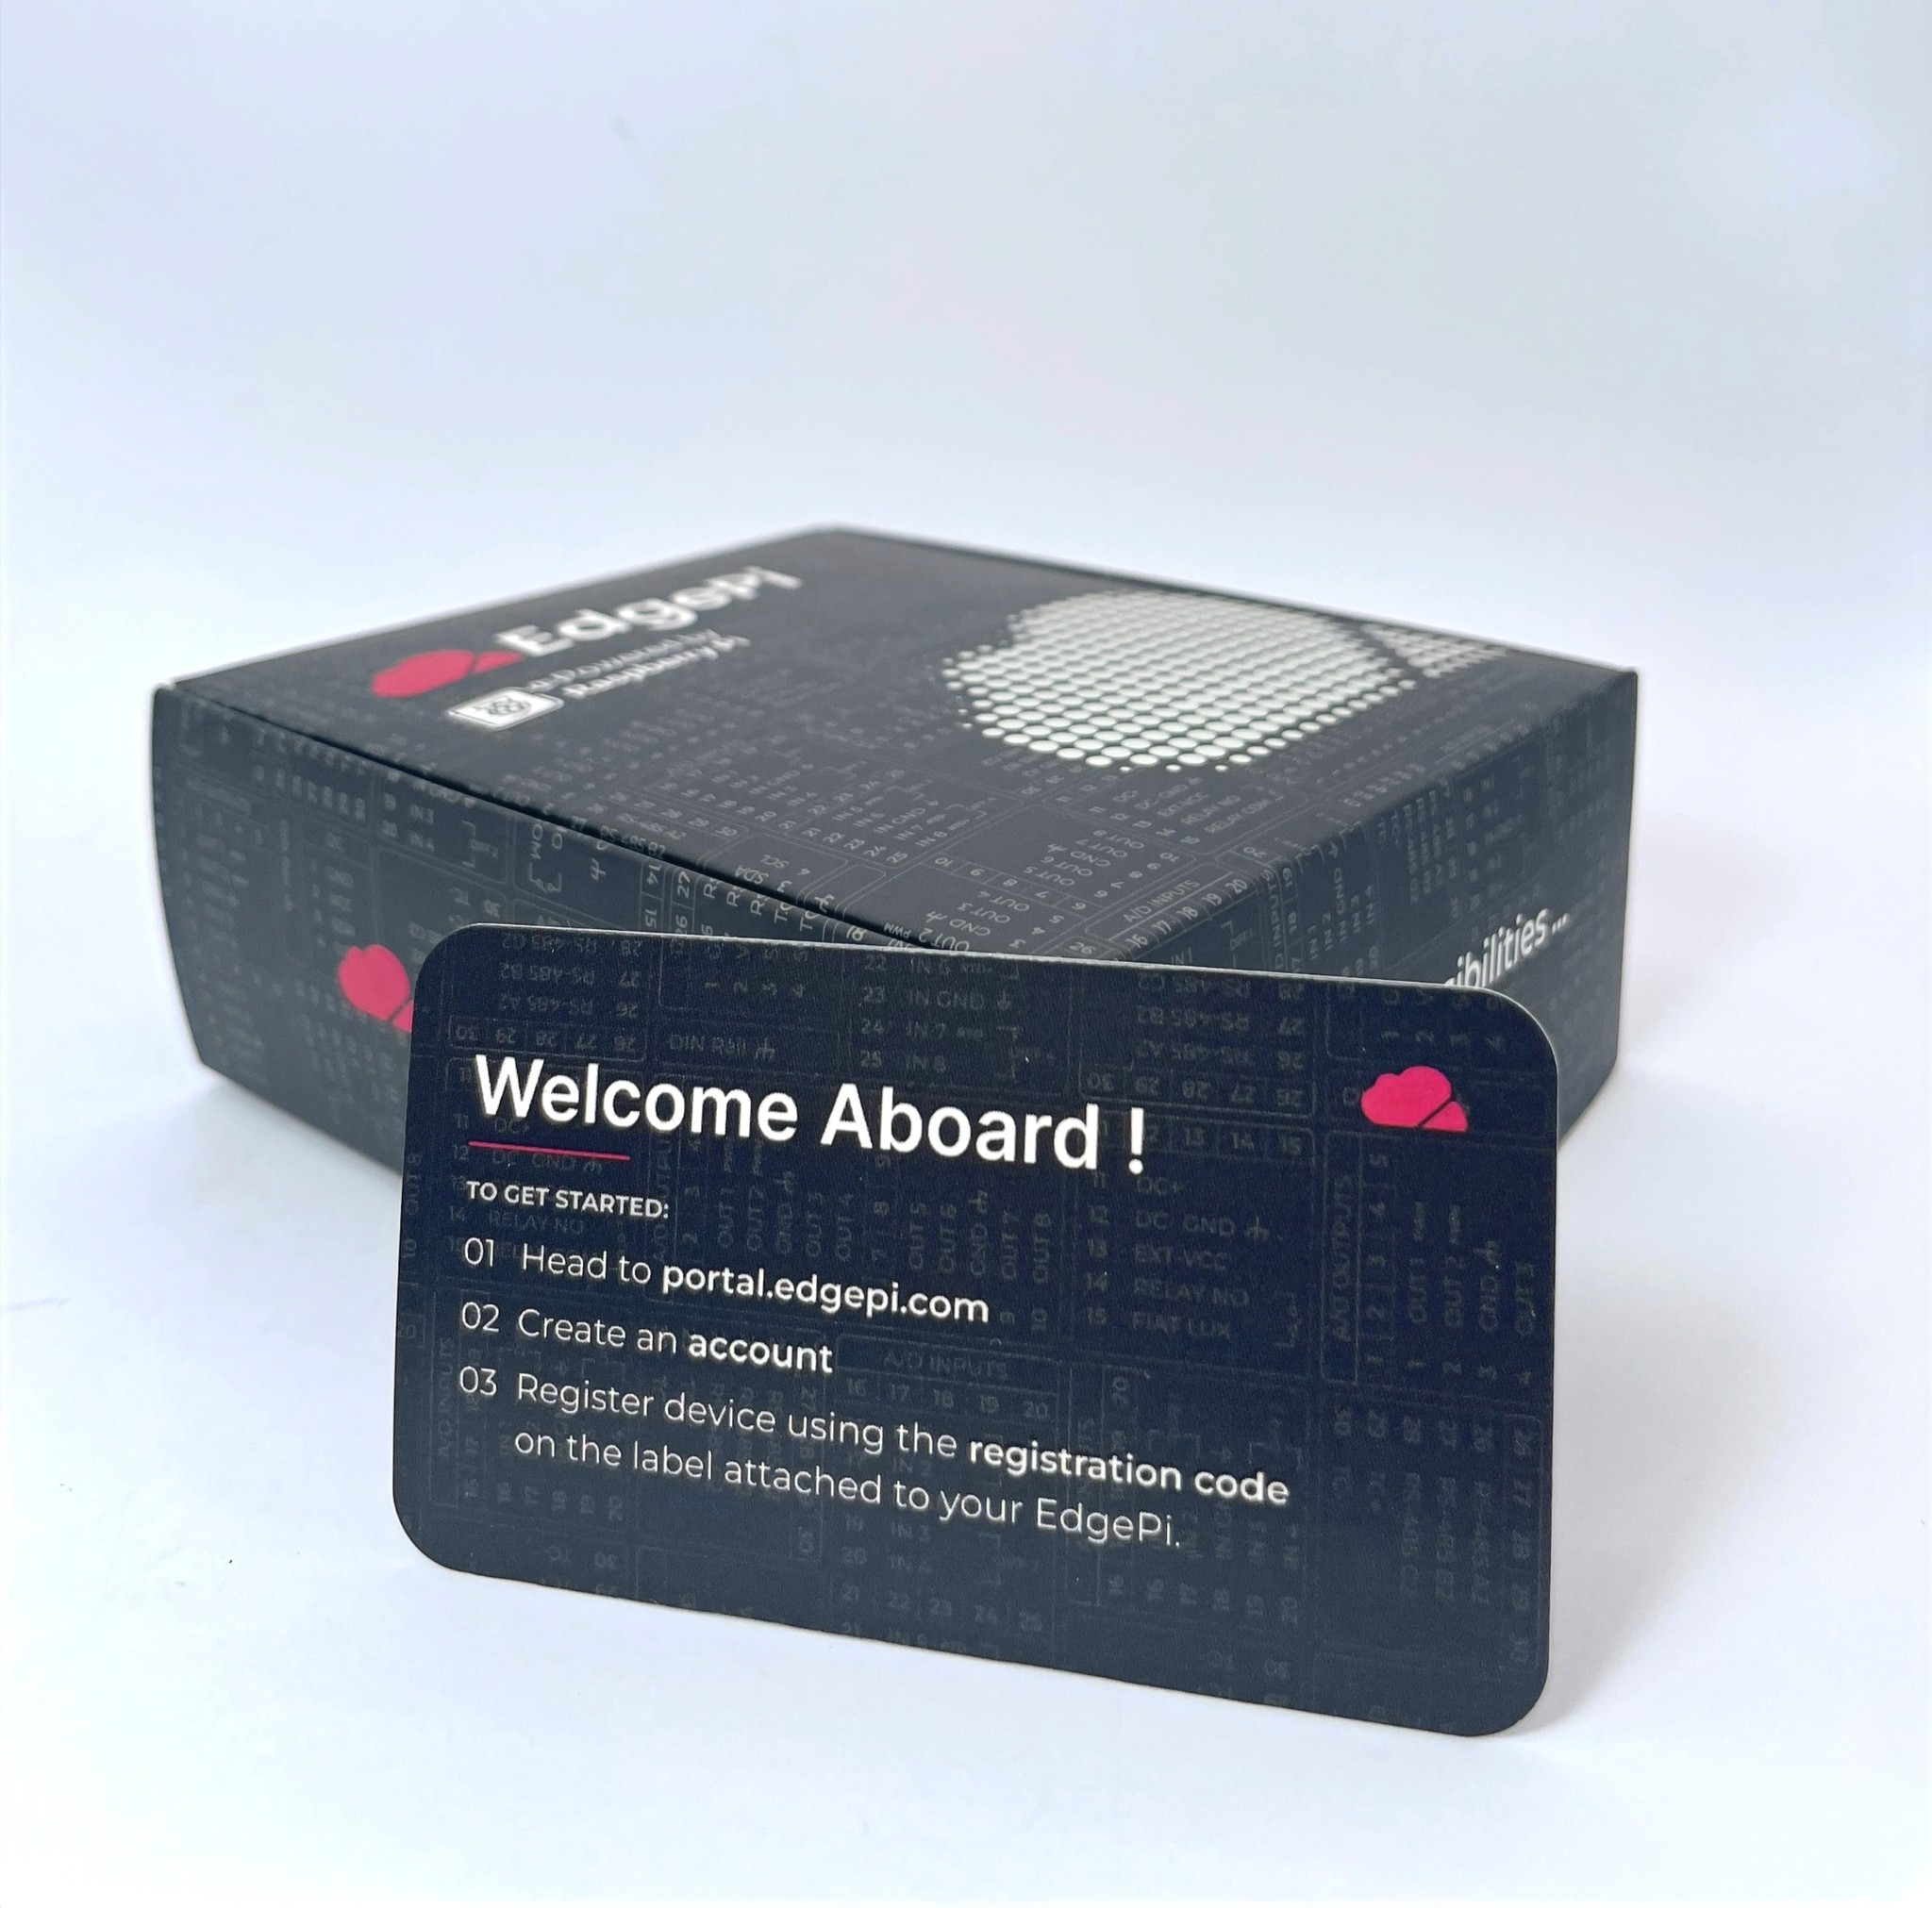
With the first iteration of the Edgepi portal conceptualized and implemented, the first batch of EdgePi’s was sent out to members of the mechatronics community for user testing and feedback.
Participants was asked to run through the onboarding process and conduct several common core tasks and then share their thoughts through a questionaire at the end. Along with the team at OSENSA, we decided to set a number of key metrics and KPI's to gauge the success of the EdgePi Portal.
Given users, both industrial and recreational, having prior basic mechatronics knowledge ...
Task Success Rate
<80%
participants should be successful in completing the assigned core tasks using the portal.
Time on Task
<30sec.
participants should spend no longer than 30 seconds to configure a specific port.
SUS Score
<70pt+
participants should be ranking the portal MVP, a system usability scale score of greater than 75.
CSAT Score
<75pt+
participants should be ranking the portal MVP, a satisfaction score of greater than 75.
04.2 Valuable feedback and improvements from our users
The results of the 10 questionnaires was incredibly constructive in providing me with many areas of improvement and insights based on the key metrics set beforehand.
Albeit the small sample size, behavioural KPI’s such as the task success rate was an overwhelming 90%, with time on task hitting an average of 28 seconds depending on the core task. Attitudinal KPI’s however was missing the mark with both SUS and CSAT scores missing the benchmark.
Task Success Rate
90%
participants successfully completed the assigned core tasks using the portal.
Time on Task
28 sec.
was the average time participants spent to complete an assigned core task.
SUS Score
65pts
was the average score participants rated the MVP in regards to its usability.
CSAT Score
70pts
was the average score participants rated the MVP in regards to their satisfaction.
Although most test users are able to successfully complete the assigned core tasks, attitudinal KPI's were lagging.
From the questionnaire, users are quoting the logic for more complicated tasks between ports can be better presented in the UI. Test users using EdgePi within an industrial context had concerns the the readings were too small to be presented on a big screen and also requested some sort of pinning functionality.
04.3 Design Iterations in preparation for EdgePi's official release
Natural Mapping
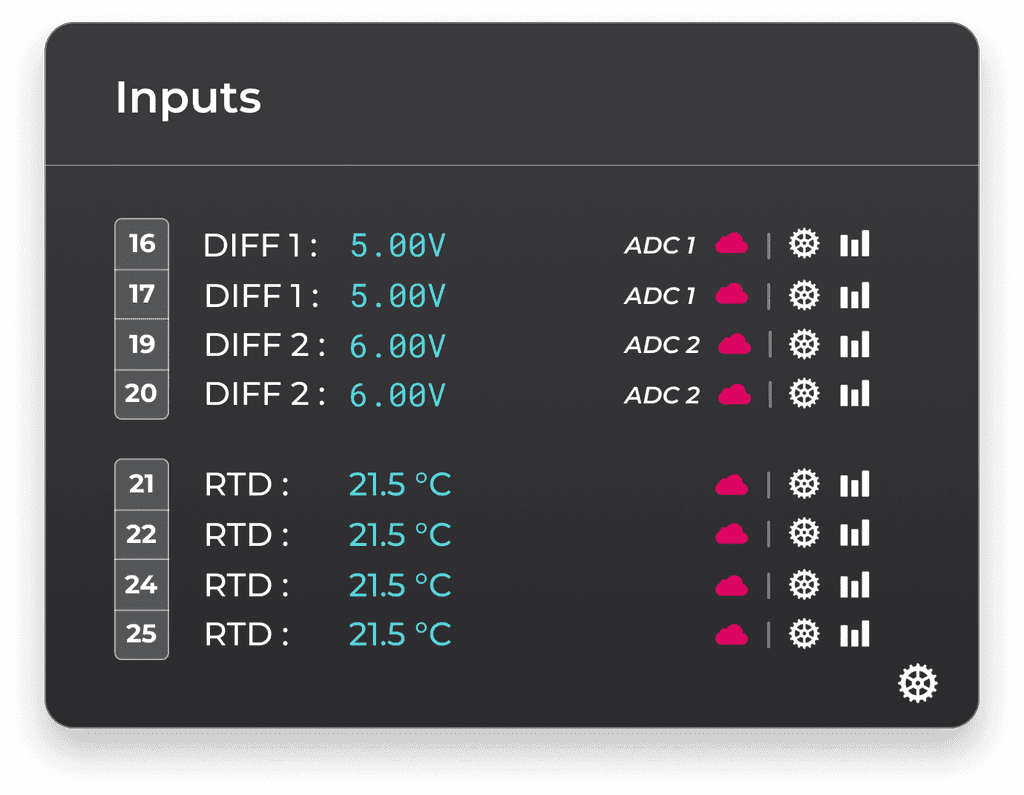
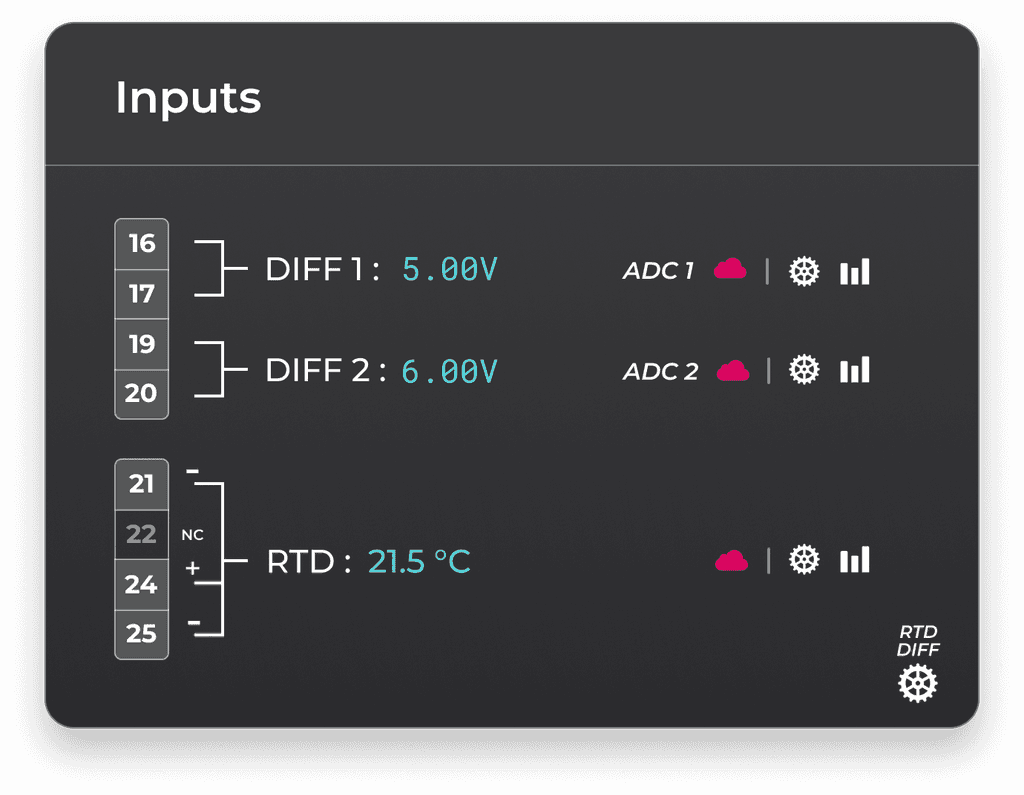
The Differential (DIFF) and Resistance Temperature Detector (RTD) requires the use of multiple ports. Users were getting confused with the repeated readings shown.
Iterating on the feedback, I decided to add an icon composed of connector lines that groups the relation between the ports and the DIFF or RTD in an attempt to utilize "natural mapping" to make the experience feel more intuitive.
Before
After
Content Grouping
Changing the operating mode within a port's settings modal will in turn change the configurations under it. Users were confused why configuration options was changing.
By grouping the configurations available for each operating mode and styling it in a way where the configurations are under the operating mode in a hierarchal sense, inputs are presented to users in a more logical manner.
Before
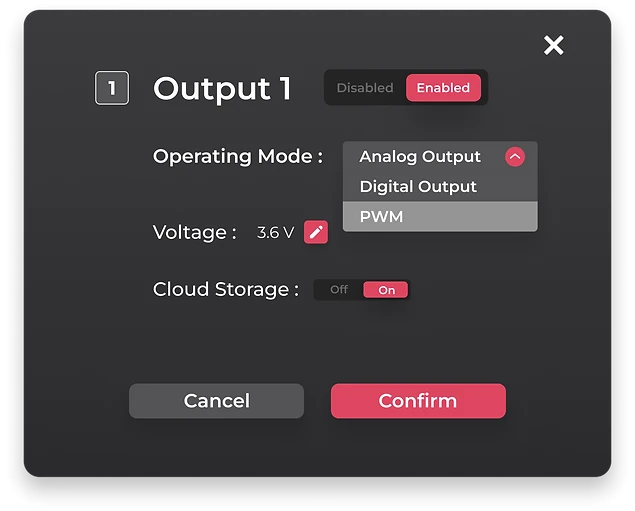
After
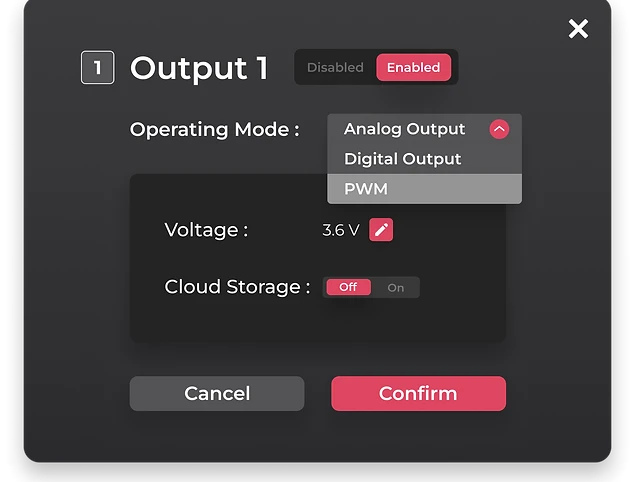
Flexibility & Efficiency of Use
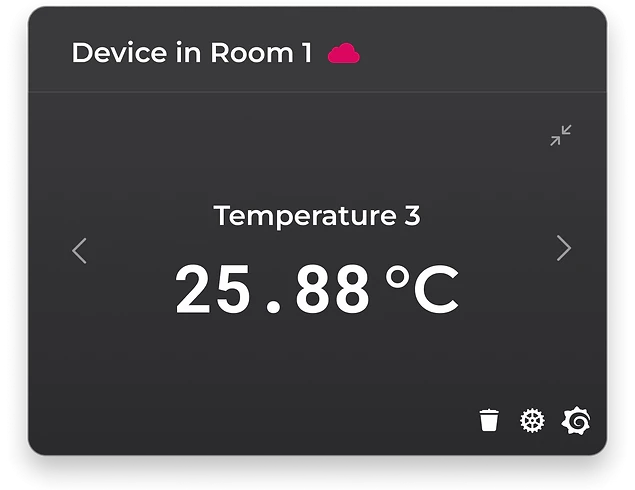
For users with multiple sensors and devices attached to EdgePi, finding the reading for a specific device proves to be difficult. Users requested some sort of pin functionality.
Added an enlarge and minimize functionality to specific readings for custom cards, allowing users to tailor the interface based on their own preferences and needs.
Before

After
Context, Tips & Empty States
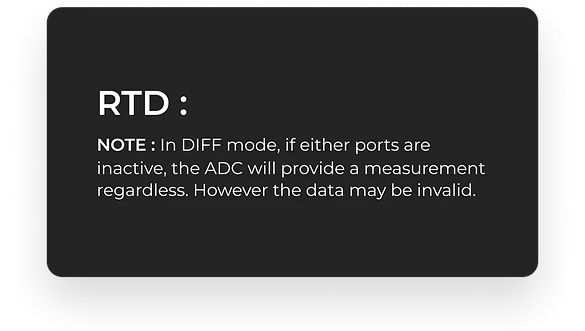
More advanced users provided insight into areas where more novice users would encounter confusion and recommended further context and tips that could be added.
Added insightful tooltips and error messages to eliminate error prone conidtions for novice users.
New

New

New
05 /
Conclusion
Takeaways / Other Touch-Points
05.1 Learnings from shipping my first real-world product
I made a lot of mistakes, but it was an incredible learning opportunity nonetheless.
EdgePi was my first ever professional end-to-end experience that I shipped. I've learnt to trust the process.
Designing for EdgePi was particular daunting as it was an interface solution for a product that I had no expertise or background knowledge in. Luckily, the team at OSENSA was extremely sympathetic, provided me with a lot of insight into the product, and most importantly actively participated in the design process. They trusted me fully and I am truly very fortunate to be given this opportunity.
Real-world requirements often change... learning to adapt is a critical skill.
Unlike school projects, projects done in a professional context often have many interconnected parts and changing variables.
Requirements change, new variables gets introduced, and problems often arise requiring me to think of workaround or rethink my solution completely. This experience really highlighted the importance of a structured iterative design process, with each step building off of the next.
Involving stakeholders early on in the process when possible was critical.
The UI design of the interface is only one part of a bigger picture. As the UX Designer, my work revolves around many other disciplines.
Throughout my co-op, I worked closely with the development team, making sure to bring them in right from the beginning of the design process. Looking back, this was the correct decision as team members was able to freely add their expertise into the conversation.
05.2 Other touch points I designed
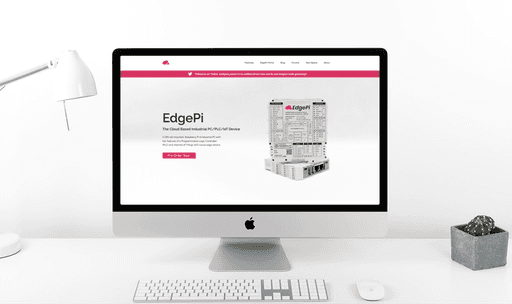
EdgePi Website
Designed using Figma and implemented using Wix the EdgePi website that goes into depth the device's applications, software and hardware capabilities, as well as a forum and blog for enthusiasts to keep up to date with our development.
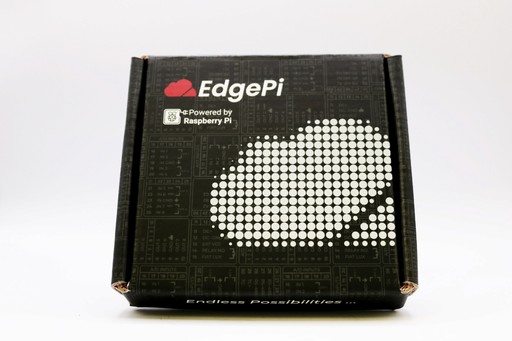
EdgePi Packaging
Designed the packaging box the EdgePi will be shipped in. Ideated on Figma and refined on Adobe Illustrator. Conducted supplier relations by contacting different vendors, compared samples, and prepared the relevant design files.
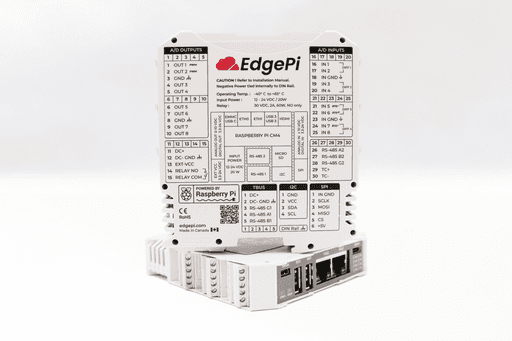
EdgePi Enclosure
Designed the printed label on the EdgePi's enclosure. Used Adobe Illustrator to design a label that labels each of the physical ports in a compact yet intuitive manner. Again, conducted supplier relations and prepared the design files.


(2023)
OSENSA EdgePi Portal
Conceptualized EdgePi’s proprietary portal, a platform that enables the cloud based industrial PC to be configured remotely.
In the Spring of 2022, I had the opportunity to join OSENSA Innovations as a UI UX Designer co-op student, working exclusively on EdgePi, a revolutionary cloud based industrial PC. This Raspberry Pi powered industrial PC is capable of being configured online through its online portal. Data read from EdgePi can be saved onto the cloud where it can be viewed through Grafana, an analytics and data visualization web application.
ROLE
Product Design Co-op
TIMELINE
May 2021 - Apr 2023
ORGANIZATION
OSENSA Innovations
TEAM
EdgePi
PLATFORM
EdgePi Portal
TYPE
B2B + B2C
RESPONSIBILITIES
End-to-end Product Design
Design Thinking Methods
UI+UX
Design System
Branding Guide
Touchpoint Design
Photography
Designing and shipping my first end-to-end experience.
The release of EdgePi Portal V1.0.0 in numbers.
6
Unique touchpoints
Spanning across website, e-comm store, product label, packaging & digital portal.
86
Monthly active users
Consisting of ~60% industrial users and ~40% hobbyists.
72%
Conversion rate
From a free to a paid plan, unlocking additional remote access features.
4.0/5
Average feedback rating
From a survey sent via e-mail to all purchasing customers.
Designing a dashboard interface for industrial and hobbyist users.
Utilizing a multitude of interaction design methods and co-design sessions with my co-workers, I instilled a design culture within the company to inform the development process.
During this year-and-a-half-long co-op, I led the end-to-end development process of EdgePi Portal's multiple touch-points from initial concept through to final delivery. I created a design system to ensure scalability of the platform and consistent branding throughout EdgePi's touch-points such as its marketing website, packaging, and device label.
How Might We ...
Create an intuitive, human centric platform, that captures the full functionality of an Industrial PC/PLC/IoT device, while simplifying its inherent complexity in order to cater to both professionals utilizing EdgePi for industrial factory automation, and novice/ hobbyists utilizing EdgePi for home & school projects.
HIGHLIGHTS

An intuitive layout & visual design
Content is organized into digestible chunks with each module being displayed as cards, allowing for better legibility and reduced cognitive load for users.

Begin reading and configuring in minutes
Users are instructed to scan the unique QR Code located on the back of the EdgePi enclosure and attach the newly added device to a prepaid data plan.

Utilizing natural mapping to achieve an internal consistency among touch-points
Cards presents the ports numerically, and in chronological order, following the layout of ports shown on the enclosure and on the device. By presenting ports in a similar fashion to how it is presented on the physical enclosure, I established internal consistency to increase intuitivity.

Managing complexity using progressive disclosure
Module configurations are placed within each card’s settings, displayed as modals. These more complex options are presented to users in time and when needed.

Tailoring the user experience for the more advanced user
Catering to the industrial use case of EdgePi, users have the option to view EdgePi Portal through a compact mode. Instructional content is replaced with additional accelerators, personalizations, and customizations, to streamline workflow for the more advanced user.
Plug-and-Play right out of the box.
Begin configuring in minutes.
After subscribing to a subscription data plan, users can add their EdgePi by scanning the unique QR Code located on the device's enclosure and then attaching it to a prepaid data plan.
Designed with Intuitiveness in Mind, utilizing Natural Mapping & Progressive Disclosure
EdgePi's modules are shown as cards on the dashboard, with each port displayed identically to how it is shown on the enclosure label. Configurations are placed within modals, only presented when needed.
A Centralized Hub for all things EdgePi.
Users can manage all aspects related to their EdgePi Devices through the EdgePi Portal, from attached devices, to subscriptions plans, to order history.
IMPACT
My Contribution.
Led the end-to-end experience for EdgePi Portal as the sole designer. Saw the portal from ideation, to MVP Testing with community users, to its ultimate release.
Instilled a design culture within the organization by conducting collaborative co-design ideation sessions in order to familiarize stakeholders with the design process and its methods.
Created an EdgePi design system to ensure long-term scalability of the platform, and consistent branding throughout EdgePi's many marketing touch-points including its marketing website, web storefront, packaging and other branding designs shipped by me.
01 /
DESIGN ETHNOGRAPHY
Stakeholder Interviews / Site Visit / Competitive Analysis
EdgePi was a complicated industrial PC with both hardware and software elements that required specific technical knowledge that I did not possess. At the beginning, it was important for me to spend some time understanding the context of the product before I head into ideation.
01.1 Understanding the ask from the stakeholders
Primary phase of my user research involved inquiring about EdgePi as an Industrial PC, expectations for the interface from the team, and possible pain points that may arise.
OSENSA Innovations
Chief Technological Officer
Gathered insight into the capabilities of EdgePi, the context of the problem, and the functionalities the portal must possess.
“The EdgePi Portal is what sets our Raspberry Pi Powered industrial PC from our competitors. A good balance will have to be struck between the inherent complexity of an industrial PC and learnability of our portal interface in order to cater to our broad target audience.”
OSENSA Innovations
Back-end Developer
Gathered insight into the development logic that the EdgePi Portal UI will use in order to control the EdgePi device remotely.
“We will be primarily using AWS IoT Device Shadow Service to control the device. The EdgePi Portal interface should present the state of each configuration on the EdgePi and have input controls for users to change those said states.”
OSENSA Innovations
Front-end Developer
Gathered insight into how the portal interface would be implemented and any constraints or feasibility issues that may arise.
“The EdgePi Portal interface would be coded using ReactJS and Chakra UI. Both of these programs have component libraries that could be used in the design to make my life easier, although new design elements can also be created if needed.”
OSENSA Innovations
Back-end Developer
Gathered insight into the hardware anatomy of an EdgePi device such as its ports, microchips and boards.
“EdgePi in summary is a cloud integrated industrial PC, PLC (Programmable Logic Controller), and IoT edge device, with multiple channels of input and outputs. Most of the ports will have to be configured somehow using the portal.”
01.2 Immersing myself into EdgePi's real-world use case
Secondary Phase of my user research involved scheduling a walkthrough with a mechatronics engineer to walkthrough the real-world use cases of EdgePi.

Understanding EdgePi is still a work-in-progress
Visited the in-house cleanroom where the first batch of EdgePi's are being built. Prototypes are currently undergoing QA and QC testing before full production.

Understanding EdgePi in a Home and School setting.
Visited a mechatronic's workspace where different breadboard setups were being set up, imitating what it would look for hobbyists and students using EdgePi.

Understanding EdgePi in an Industrial Automation setting.
Visited the mechatronic lab where different boards were being tested to cater towards professionals using EdgePi in an industrial setting such as factory automation.
01.3 Learning from what's out there already
Final phase of my user research comprised of gaining an understanding of existing related products in the market in order to gauge EdgePi's strength and weaknesses.
EdgePi was a complicated industrial PC with both hardware and software elements that required specific technical knowledge that I did not possess. At the beginning, it was important for me to spend some time understanding the context of the product before I head into ideation.


The competition is heavily geared towards industrial applications and does not cater at all to the hobbyist/student demographic. Their proprietary interfaces prioritizes function over form and can be intimidating and difficult to comprehend for beginners.
I realized that there was no shortage of companies creating Raspberry Pi Powered devices for industrial solutions. However what sets EdgePi apart from its competitors was its cloud capabilities and its intuitive, beginner friendly user interface accomplished through the EdgePi Portal.
02 /
DEFINING THE PROBLEM
Affinity Mapping / User Personas / User Journey
After consolidating my data gathered from the design ethnography stage, I chose to go into the define phase of the design process collaboratively with the team at OSENSA in order to familiarize the team that is relatively new to the field of interaction design to its methods, and to gain critical feedback early onbased on my colleague's expertise.
02.1 Co-design sessions to bring the conversation to the larger group
During the define phase, I created a physical affinity map to encourage my coworkers to join in on the conversation and help form insights and brainstorm ideas collaboratively.
The affinity mapping helped me organize the extremely diverse information from different stakeholders gathered from the design ethnography into a coherent and meaningful presentation. After the map was set up, some recurring themes and patterns began to appear.

02.2 Turning stakeholder defined target audiences into personas
EdgePi's 2 main target audiences were then presented as user persona archetypes, a mechatronics university student that regularly conducts personal electronic projects at home as a hobby, and a CEO looking for an cloud-based industrial PC to aid in factory automation.
These 2 archetypes was extremely useful in helping me ground my design and made sure I was cognizant of my user's diverse goals, preferences, and pain points. Often during setbacks that required design iterations, I would often go back to my personas to remind myself who I was designing for.


02.3 Visualizing the complete customer onboarding journey
Lastly, I created a journey map to create a visualization of the many processes and steps the user would go through when interacting with the EdgePi Portal. Each step of the map gave me potential areas of improvement as well as insight into steps that required a higher mental load from users.
The actor and POV of the journey map was one of my user personas. Unfortunately the data to inform the creation of the journey map was not 100% based on real data as I did not have the opportunity to interview a mechatronic student /hobbyist. I instead used the data that I've received from the in-house user interviews, field studies, and competitive analysis and try my best to link it to an individual from this user archetype.

03 /
IDEATION + PIVOT
Initial Ideation / The Pivot / Sketches
03.1 Incorpoating feedback into rapid ideation in low fidelity
The ideation of the Dashboard was an iterative process and I went back and forth between sketching, wire-framing and creating low-fidelity designs on Figma.
As many hardware and software components of the EdgePi was still being worked on, there would often be times where my requirements would change or new functionalities or restrictions would be added at a moments notice, forcing me to modify existing ideas or brainstorm new ones.


03.2 Uh oh. Here comes the pivot…
However as development of the EdgePi continued, with some major changes to the hardware of EdgePi, coupled with the software backend side learning more capabilities about the AWS IoT Device Shadow Service, EdgePi can now provide users with a lot more customizations to its functionalities through its portal than previously thought.
The portal originally thought to only control and store data from components as a module such as inputs, outputs, LED's, was later discovered that each individual port can now be manipulated by the user and have their data logged onto the cloud.
With the changes, I had to quickly pivot but soon realized that with the current ideation direction that there were simply too many configurations to have all actions on one screen.
I returned back to my affinity map and began modifying it to reflect some of the changes. I started brainstorming a design that incorporated the new functionality requirements while being mindful of EdgePi's target audiences as demonstrated by the 2 user personas created.
Reviewing the user journey, I began conceptualizing a Dashboard that was divided into View Mode and Edit Mode, in which the Dashboard will show the readings of each components and all configurations would be done through modal screens.

03.3 Back to the drawing board with another round of ideation
Learning from my previous mistake of increasing the fidelity of my interface ideations too quickly, I returned to the sketching phase to explore and iterate on various ideas.
With low fidelity sketches, it provided a high level exploration of how the EdgePi portal user interface would work without getting bogged down by the details. I was able to quickly visualize different concepts and present it in meetings that aided collaboration and communication. Based on the feedback from the team, I would adjust and refine the sketches accordingly.
Add a Device

Dashboard

Portal Homepage

Dashboard Cont.

Order History

Device Overview

Subscription Plan

04 /
MVP User Testing
MVP Testing / Testing Feedback / Design Iterations
04.1 Getting the EdgePi MVP into the hands of the community
With the first iteration of the Edgepi portal conceptualized and implemented, the first batch of EdgePi’s was sent out to members of the mechatronics community for user testing and feedback.
Participants was asked to run through the onboarding process and conduct several common core tasks and then share their thoughts through a questionaire at the end. Along with the team at OSENSA, we decided to set a number of key metrics and KPI's to gauge the success of the EdgePi Portal.
Given users, both industrial and recreational, having prior basic mechatronics knowledge ...
Task Success Rate
<80%
participants should be successful in completing the assigned core tasks using the portal.
Time on Task
<30sec.
participants should spend no longer than 30 seconds to configure a specific port.
SUS Score
<70pt+
participants should be ranking the portal MVP, a system usability scale score of greater than 75.
CSAT Score
<75pt+
participants should be ranking the portal MVP, a satisfaction score of greater than 75.

04.2 Valuable feedback and improvements from our users
The results of the 10 questionnaires was incredibly constructive in providing me with many areas of improvement and insights based on the key metrics set beforehand.
Albeit the small sample size, behavioural KPI’s such as the task success rate was an overwhelming 90%, with time on task hitting an average of 28 seconds depending on the core task. Attitudinal KPI’s however was missing the mark with both SUS and CSAT scores missing the benchmark.
Task Success Rate
90%
participants successfully completed the assigned core tasks using the portal.
Time on Task
28 sec.
was the average time participants spent to complete an assigned core task.
SUS Score
65pts
was the average score participants rated the MVP in regards to its usability.
CSAT Score
70pts
was the average score participants rated the MVP in regards to their satisfaction.
Although most test users are able to successfully complete the assigned core tasks, attitudinal KPI's were lagging.
From the questionnaire, users are quoting the logic for more complicated tasks between ports can be better presented in the UI. Test users using EdgePi within an industrial context had concerns the the readings were too small to be presented on a big screen and also requested some sort of pinning functionality.
04.3 Design Iterations in preparation for EdgePi's official release
Natural Mapping
The Differential (DIFF) and Resistance Temperature Detector (RTD) requires the use of multiple ports. Users were getting confused with the repeated readings shown.
Iterating on the feedback, I decided to add an icon composed of connector lines that groups the relation between the ports and the DIFF or RTD in an attempt to utilize "natural mapping" to make the experience feel more intuitive.
Before

After

Content Grouping
Changing the operating mode within a port's settings modal will in turn change the configurations under it. Users were confused why configuration options was changing.
By grouping the configurations available for each operating mode and styling it in a way where the configurations are under the operating mode in a hierarchal sense, inputs are presented to users in a more logical manner.
Before

After

Flexibility & Efficiency of Use
For users with multiple sensors and devices attached to EdgePi, finding the reading for a specific device proves to be difficult. Users requested some sort of pin functionality.
Added an enlarge and minimize functionality to specific readings for custom cards, allowing users to tailor the interface based on their own preferences and needs.
Before

After

Context, Tips & Empty States
More advanced users provided insight into areas where more novice users would encounter confusion and recommended further context and tips that could be added.
Added insightful tooltips and error messages to eliminate error prone conidtions for novice users.
New

New

New

05 /
Conclusion
Takeaways / Other Touch-Points
05.1 Learnings from shipping my first real-world product
I made a lot of mistakes, but it was an incredible learning opportunity nonetheless.
EdgePi was my first ever professional end-to-end experience that I shipped. I've learnt to trust the process.
Designing for EdgePi was particular daunting as it was an interface solution for a product that I had no expertise or background knowledge in. Luckily, the team at OSENSA was extremely sympathetic, provided me with a lot of insight into the product, and most importantly actively participated in the design process. They trusted me fully and I am truly very fortunate to be given this opportunity.
Real-world requirements often change... learning to adapt is a critical skill.
Unlike school projects, projects done in a professional context often have many interconnected parts and changing variables.
Requirements change, new variables gets introduced, and problems often arise requiring me to think of workaround or rethink my solution completely. This experience really highlighted the importance of a structured iterative design process, with each step building off of the next.
Involving stakeholders early on in the process when possible was critical.
The UI design of the interface is only one part of a bigger picture. As the UX Designer, my work revolves around many other disciplines.
Throughout my co-op, I worked closely with the development team, making sure to bring them in right from the beginning of the design process. Looking back, this was the correct decision as team members was able to freely add their expertise into the conversation.
05.2 Other touch points I designed

EdgePi Website
Designed using Figma and implemented using Wix the EdgePi website that goes into depth the device's applications, software and hardware capabilities, as well as a forum and blog for enthusiasts to keep up to date with our development.

EdgePi Packaging
Designed the packaging box the EdgePi will be shipped in. Ideated on Figma and refined on Adobe Illustrator. Conducted supplier relations by contacting different vendors, compared samples, and prepared the relevant design files.

EdgePi Enclosure
Designed the printed label on the EdgePi's enclosure. Used Adobe Illustrator to design a label that labels each of the physical ports in a compact yet intuitive manner. Again, conducted supplier relations and prepared the design files.


(2023)
OSENSA EdgePi Portal
Conceptualized EdgePi’s proprietary portal, a platform that enables the cloud based industrial PC to be configured remotely.
In the Spring of 2022, I had the opportunity to join OSENSA Innovations as a UI UX Designer co-op student, working exclusively on EdgePi, a revolutionary cloud based industrial PC. This Raspberry Pi powered industrial PC is capable of being configured online through its online portal. Data read from EdgePi can be saved onto the cloud where it can be viewed through Grafana, an analytics and data visualization web application.
ROLE
Product Design Co-op
TIMELINE
May 2021 - Apr 2023
ORGANIZATION
OSENSA Innovations
TEAM
EdgePi
PLATFORM
EdgePi Portal
TYPE
B2B + B2C
RESPONSIBILITIES
End-to-end Product Design
Design Thinking Methods
UI+UX
Design System
Branding Guide
Touchpoint Design
Photography
Designing and shipping my first end-to-end experience.
The release of EdgePi Portal V1.0.0 in numbers.
6
Unique touchpoints
Spanning across website, e-comm store, product label, packaging & digital portal.
86
Monthly active users
Consisting of ~60% industrial users and ~40% hobbyists.
72%
Conversion rate
From a free to a paid plan, unlocking additional remote access features.
4.0/5
Average feedback rating
From a survey sent via e-mail to all purchasing customers.
Designing a dashboard interface for industrial and hobbyist users.
Utilizing a multitude of interaction design methods and co-design sessions with my co-workers, I instilled a design culture within the company to inform the development process.
During this year-and-a-half-long co-op, I led the end-to-end development process of EdgePi Portal's multiple touch-points from initial concept through to final delivery. I created a design system to ensure scalability of the platform and consistent branding throughout EdgePi's touch-points such as its marketing website, packaging, and device label.
How Might We ...
Create an intuitive, human centric platform, that captures the full functionality of an Industrial PC/PLC/IoT device, while simplifying its inherent complexity in order to cater to both professionals utilizing EdgePi for industrial factory automation, and novice/ hobbyists utilizing EdgePi for home & school projects.
HIGHLIGHTS

An intuitive layout & visual design
Content is organized into digestible chunks with each module being displayed as cards, allowing for better legibility and reduced cognitive load for users.

Begin reading and configuring in minutes
Users are instructed to scan the unique QR Code located on the back of the EdgePi enclosure and attach the newly added device to a prepaid data plan.

Utilizing natural mapping to achieve an internal consistency among touch-points
Cards presents the ports numerically, and in chronological order, following the layout of ports shown on the enclosure and on the device. By presenting ports in a similar fashion to how it is presented on the physical enclosure, I established internal consistency to increase intuitivity.

Managing complexity using progressive disclosure
Module configurations are placed within each card’s settings, displayed as modals. These more complex options are presented to users in time and when needed.

Tailoring the user experience for the more advanced user
Catering to the industrial use case of EdgePi, users have the option to view EdgePi Portal through a compact mode. Instructional content is replaced with additional accelerators, personalizations, and customizations, to streamline workflow for the more advanced user.
Plug-and-Play right out of the box.
Begin configuring in minutes.
After subscribing to a subscription data plan, users can add their EdgePi by scanning the unique QR Code located on the device's enclosure and then attaching it to a prepaid data plan.
Designed with Intuitiveness in Mind, utilizing Natural Mapping & Progressive Disclosure
EdgePi's modules are shown as cards on the dashboard, with each port displayed identically to how it is shown on the enclosure label. Configurations are placed within modals, only presented when needed.
A Centralized Hub for all things EdgePi.
Users can manage all aspects related to their EdgePi Devices through the EdgePi Portal, from attached devices, to subscriptions plans, to order history.
IMPACT
My Contribution.
Led the end-to-end experience for EdgePi Portal as the sole designer. Saw the portal from ideation, to MVP Testing with community users, to its ultimate release.
Instilled a design culture within the organization by conducting collaborative co-design ideation sessions in order to familiarize stakeholders with the design process and its methods.
Created an EdgePi design system to ensure long-term scalability of the platform, and consistent branding throughout EdgePi's many marketing touch-points including its marketing website, web storefront, packaging and other branding designs shipped by me.
01 /
DESIGN ETHNOGRAPHY
Stakeholder Interviews / Site Visit / Competitive Analysis
EdgePi was a complicated industrial PC with both hardware and software elements that required specific technical knowledge that I did not possess. At the beginning, it was important for me to spend some time understanding the context of the product before I head into ideation.
01.1 Understanding the ask from the stakeholders
Primary phase of my user research involved inquiring about EdgePi as an Industrial PC, expectations for the interface from the team, and possible pain points that may arise.
OSENSA Innovations
Chief Technological Officer
Gathered insight into the capabilities of EdgePi, the context of the problem, and the functionalities the portal must possess.
“The EdgePi Portal is what sets our Raspberry Pi Powered industrial PC from our competitors. A good balance will have to be struck between the inherent complexity of an industrial PC and learnability of our portal interface in order to cater to our broad target audience.”
OSENSA Innovations
Back-end Developer
Gathered insight into the development logic that the EdgePi Portal UI will use in order to control the EdgePi device remotely.
“We will be primarily using AWS IoT Device Shadow Service to control the device. The EdgePi Portal interface should present the state of each configuration on the EdgePi and have input controls for users to change those said states.”
OSENSA Innovations
Front-end Developer
Gathered insight into how the portal interface would be implemented and any constraints or feasibility issues that may arise.
“The EdgePi Portal interface would be coded using ReactJS and Chakra UI. Both of these programs have component libraries that could be used in the design to make my life easier, although new design elements can also be created if needed.”
OSENSA Innovations
Back-end Developer
Gathered insight into the hardware anatomy of an EdgePi device such as its ports, microchips and boards.
“EdgePi in summary is a cloud integrated industrial PC, PLC (Programmable Logic Controller), and IoT edge device, with multiple channels of input and outputs. Most of the ports will have to be configured somehow using the portal.”
01.2 Immersing myself into EdgePi's real-world use case
Secondary Phase of my user research involved scheduling a walkthrough with a mechatronics engineer to walkthrough the real-world use cases of EdgePi.

Understanding EdgePi is still a work-in-progress
Visited the in-house cleanroom where the first batch of EdgePi's are being built. Prototypes are currently undergoing QA and QC testing before full production.

Understanding EdgePi in a Home and School setting.
Visited a mechatronic's workspace where different breadboard setups were being set up, imitating what it would look for hobbyists and students using EdgePi.

Understanding EdgePi in an Industrial Automation setting.
Visited the mechatronic lab where different boards were being tested to cater towards professionals using EdgePi in an industrial setting such as factory automation.
01.3 Learning from what's out there already
Final phase of my user research comprised of gaining an understanding of existing related products in the market in order to gauge EdgePi's strength and weaknesses.
EdgePi was a complicated industrial PC with both hardware and software elements that required specific technical knowledge that I did not possess. At the beginning, it was important for me to spend some time understanding the context of the product before I head into ideation.


The competition is heavily geared towards industrial applications and does not cater at all to the hobbyist/student demographic. Their proprietary interfaces prioritizes function over form and can be intimidating and difficult to comprehend for beginners.
I realized that there was no shortage of companies creating Raspberry Pi Powered devices for industrial solutions. However what sets EdgePi apart from its competitors was its cloud capabilities and its intuitive, beginner friendly user interface accomplished through the EdgePi Portal.
02 /
DEFINING THE PROBLEM
Affinity Mapping / User Personas / User Journey
After consolidating my data gathered from the design ethnography stage, I chose to go into the define phase of the design process collaboratively with the team at OSENSA in order to familiarize the team that is relatively new to the field of interaction design to its methods, and to gain critical feedback early onbased on my colleague's expertise.
02.1 Co-design sessions to bring the conversation to the larger group
During the define phase, I created a physical affinity map to encourage my coworkers to join in on the conversation and help form insights and brainstorm ideas collaboratively.
The affinity mapping helped me organize the extremely diverse information from different stakeholders gathered from the design ethnography into a coherent and meaningful presentation. After the map was set up, some recurring themes and patterns began to appear.

02.2 Turning stakeholder defined target audiences into personas
EdgePi's 2 main target audiences were then presented as user persona archetypes, a mechatronics university student that regularly conducts personal electronic projects at home as a hobby, and a CEO looking for an cloud-based industrial PC to aid in factory automation.
These 2 archetypes was extremely useful in helping me ground my design and made sure I was cognizant of my user's diverse goals, preferences, and pain points. Often during setbacks that required design iterations, I would often go back to my personas to remind myself who I was designing for.


02.3 Visualizing the complete customer onboarding journey
Lastly, I created a journey map to create a visualization of the many processes and steps the user would go through when interacting with the EdgePi Portal. Each step of the map gave me potential areas of improvement as well as insight into steps that required a higher mental load from users.
The actor and POV of the journey map was one of my user personas. Unfortunately the data to inform the creation of the journey map was not 100% based on real data as I did not have the opportunity to interview a mechatronic student /hobbyist. I instead used the data that I've received from the in-house user interviews, field studies, and competitive analysis and try my best to link it to an individual from this user archetype.

03 /
IDEATION + PIVOT
Initial Ideation / The Pivot / Sketches
03.1 Incorpoating feedback into rapid ideation in low fidelity
The ideation of the Dashboard was an iterative process and I went back and forth between sketching, wire-framing and creating low-fidelity designs on Figma.
As many hardware and software components of the EdgePi was still being worked on, there would often be times where my requirements would change or new functionalities or restrictions would be added at a moments notice, forcing me to modify existing ideas or brainstorm new ones.


03.2 Uh oh. Here comes the pivot…
However as development of the EdgePi continued, with some major changes to the hardware of EdgePi, coupled with the software backend side learning more capabilities about the AWS IoT Device Shadow Service, EdgePi can now provide users with a lot more customizations to its functionalities through its portal than previously thought.
The portal originally thought to only control and store data from components as a module such as inputs, outputs, LED's, was later discovered that each individual port can now be manipulated by the user and have their data logged onto the cloud.
With the changes, I had to quickly pivot but soon realized that with the current ideation direction that there were simply too many configurations to have all actions on one screen.
I returned back to my affinity map and began modifying it to reflect some of the changes. I started brainstorming a design that incorporated the new functionality requirements while being mindful of EdgePi's target audiences as demonstrated by the 2 user personas created.
Reviewing the user journey, I began conceptualizing a Dashboard that was divided into View Mode and Edit Mode, in which the Dashboard will show the readings of each components and all configurations would be done through modal screens.

03.3 Back to the drawing board with another round of ideation
Learning from my previous mistake of increasing the fidelity of my interface ideations too quickly, I returned to the sketching phase to explore and iterate on various ideas.
With low fidelity sketches, it provided a high level exploration of how the EdgePi portal user interface would work without getting bogged down by the details. I was able to quickly visualize different concepts and present it in meetings that aided collaboration and communication. Based on the feedback from the team, I would adjust and refine the sketches accordingly.
Add a Device

Dashboard

Portal Homepage

Dashboard Cont.

Order History

Device Overview

Subscription Plan

04 /
MVP User Testing
MVP Testing / Testing Feedback / Design Iterations
04.1 Getting the EdgePi MVP into the hands of the community
With the first iteration of the Edgepi portal conceptualized and implemented, the first batch of EdgePi’s was sent out to members of the mechatronics community for user testing and feedback.
Participants was asked to run through the onboarding process and conduct several common core tasks and then share their thoughts through a questionaire at the end. Along with the team at OSENSA, we decided to set a number of key metrics and KPI's to gauge the success of the EdgePi Portal.
Given users, both industrial and recreational, having prior basic mechatronics knowledge ...
Task Success Rate
<80%
participants should be successful in completing the assigned core tasks using the portal.
Time on Task
<30sec.
participants should spend no longer than 30 seconds to configure a specific port.
SUS Score
<70pt+
participants should be ranking the portal MVP, a system usability scale score of greater than 75.
CSAT Score
<75pt+
participants should be ranking the portal MVP, a satisfaction score of greater than 75.

04.2 Valuable feedback and improvements from our users
The results of the 10 questionnaires was incredibly constructive in providing me with many areas of improvement and insights based on the key metrics set beforehand.
Albeit the small sample size, behavioural KPI’s such as the task success rate was an overwhelming 90%, with time on task hitting an average of 28 seconds depending on the core task. Attitudinal KPI’s however was missing the mark with both SUS and CSAT scores missing the benchmark.
Task Success Rate
90%
participants successfully completed the assigned core tasks using the portal.
Time on Task
28 sec.
was the average time participants spent to complete an assigned core task.
SUS Score
65pts
was the average score participants rated the MVP in regards to its usability.
CSAT Score
70pts
was the average score participants rated the MVP in regards to their satisfaction.
Although most test users are able to successfully complete the assigned core tasks, attitudinal KPI's were lagging.
From the questionnaire, users are quoting the logic for more complicated tasks between ports can be better presented in the UI. Test users using EdgePi within an industrial context had concerns the the readings were too small to be presented on a big screen and also requested some sort of pinning functionality.
04.3 Design Iterations in preparation for EdgePi's official release
Natural Mapping
The Differential (DIFF) and Resistance Temperature Detector (RTD) requires the use of multiple ports. Users were getting confused with the repeated readings shown.
Iterating on the feedback, I decided to add an icon composed of connector lines that groups the relation between the ports and the DIFF or RTD in an attempt to utilize "natural mapping" to make the experience feel more intuitive.
Before

After

Content Grouping
Changing the operating mode within a port's settings modal will in turn change the configurations under it. Users were confused why configuration options was changing.
By grouping the configurations available for each operating mode and styling it in a way where the configurations are under the operating mode in a hierarchal sense, inputs are presented to users in a more logical manner.
Before

After

Flexibility & Efficiency of Use
For users with multiple sensors and devices attached to EdgePi, finding the reading for a specific device proves to be difficult. Users requested some sort of pin functionality.
Added an enlarge and minimize functionality to specific readings for custom cards, allowing users to tailor the interface based on their own preferences and needs.
Before

After

Context, Tips & Empty States
More advanced users provided insight into areas where more novice users would encounter confusion and recommended further context and tips that could be added.
Added insightful tooltips and error messages to eliminate error prone conidtions for novice users.
New

New

New

05 /
Conclusion
Takeaways / Other Touch-Points
05.1 Learnings from shipping my first real-world product
I made a lot of mistakes, but it was an incredible learning opportunity nonetheless.
EdgePi was my first ever professional end-to-end experience that I shipped. I've learnt to trust the process.
Designing for EdgePi was particular daunting as it was an interface solution for a product that I had no expertise or background knowledge in. Luckily, the team at OSENSA was extremely sympathetic, provided me with a lot of insight into the product, and most importantly actively participated in the design process. They trusted me fully and I am truly very fortunate to be given this opportunity.
Real-world requirements often change... learning to adapt is a critical skill.
Unlike school projects, projects done in a professional context often have many interconnected parts and changing variables.
Requirements change, new variables gets introduced, and problems often arise requiring me to think of workaround or rethink my solution completely. This experience really highlighted the importance of a structured iterative design process, with each step building off of the next.
Involving stakeholders early on in the process when possible was critical.
The UI design of the interface is only one part of a bigger picture. As the UX Designer, my work revolves around many other disciplines.
Throughout my co-op, I worked closely with the development team, making sure to bring them in right from the beginning of the design process. Looking back, this was the correct decision as team members was able to freely add their expertise into the conversation.
05.2 Other touch points I designed

EdgePi Website
Designed using Figma and implemented using Wix the EdgePi website that goes into depth the device's applications, software and hardware capabilities, as well as a forum and blog for enthusiasts to keep up to date with our development.

EdgePi Packaging
Designed the packaging box the EdgePi will be shipped in. Ideated on Figma and refined on Adobe Illustrator. Conducted supplier relations by contacting different vendors, compared samples, and prepared the relevant design files.

EdgePi Enclosure
Designed the printed label on the EdgePi's enclosure. Used Adobe Illustrator to design a label that labels each of the physical ports in a compact yet intuitive manner. Again, conducted supplier relations and prepared the design files.
CONTENT
01 /
01 /
01 /
DESIGN ETHNOGRAPHY
DESIGN ETHNOGRAPHY
DESIGN ETHNOGRAPHY
Stakeholder Interviews / Site Visit / Competitive Analysis
Stakeholder Interviews / Site Visit / Competitive Analysis
Stakeholder Interviews / Site Visit / Competitive Analysis
EdgePi was a complicated industrial PC with both hardware and software elements that required specific technical knowledge that I did not possess. At the beginning, it was important for me to spend some time understanding the context of the product before I head into ideation.
01.1 Understanding the ask from the stakeholders
01.1 Understanding the ask from the stakeholders
01.1 Understanding the ask from the stakeholders
Primary phase of my user research involved inquiring about EdgePi as an Industrial PC, expectations for the interface from the team, and possible pain points that may arise.
OSENSA Innovations
Chief Technological Officer
Gathered insight into the capabilities of EdgePi, the context of the problem, and the functionalities the portal must possess.
“The EdgePi Portal is what sets our Raspberry Pi Powered industrial PC from our competitors. A good balance will have to be struck between the inherent complexity of an industrial PC and learnability of our portal interface in order to cater to our broad target audience.”
OSENSA Innovations
Back-end Developer
Gathered insight into the development logic that the EdgePi Portal UI will use in order to control the EdgePi device remotely.
“We will be primarily using AWS IoT Device Shadow Service to control the device. The EdgePi Portal interface should present the state of each configuration on the EdgePi and have input controls for users to change those said states.”
OSENSA Innovations
Front-end Developer
Gathered insight into how the portal interface would be implemented and any constraints or feasibility issues that may arise.
“The EdgePi Portal interface would be coded using ReactJS and Chakra UI. Both of these programs have component libraries that could be used in the design to make my life easier, although new design elements can also be created if needed.”
OSENSA Innovations
Back-end Developer
Gathered insight into the hardware anatomy of an EdgePi device such as its ports, microchips and boards.
“EdgePi in summary is a cloud integrated industrial PC, PLC (Programmable Logic Controller), and IoT edge device, with multiple channels of input and outputs. Most of the ports will have to be configured somehow using the portal.”
01.2 Immersing myself into EdgePi's real-world use case
01.2 Immersing myself into EdgePi's real-world use case
01.2 Immersing myself into EdgePi's real-world use case
Secondary Phase of my user research involved scheduling a walkthrough with a mechatronics engineer to walkthrough the real-world use cases of EdgePi.


Understanding EdgePi is still a work-in-progress
Visited the in-house cleanroom where the first batch of EdgePi's are being built. Prototypes are currently undergoing QA and QC testing before full production.


Understanding EdgePi in a Home and School setting.
Visited a mechatronic's workspace where different breadboard setups were being set up, imitating what it would look for hobbyists and students using EdgePi.


Understanding EdgePi in an Industrial Automation setting.
Visited the mechatronic lab where different boards were being tested to cater towards professionals using EdgePi in an industrial setting such as factory automation.
01.3 Learning from what's out there already
01.3 Learning from what's out there already
01.3 Learning from what's out there already
Final phase of my user research comprised of gaining an understanding of existing related products in the market in order to gauge EdgePi's strength and weaknesses.
EdgePi was a complicated industrial PC with both hardware and software elements that required specific technical knowledge that I did not possess. At the beginning, it was important for me to spend some time understanding the context of the product before I head into ideation.


The competition is heavily geared towards industrial applications and does not cater at all to the hobbyist/student demographic. Their proprietary interfaces prioritizes function over form and can be intimidating and difficult to comprehend for beginners.
The competition is heavily geared towards industrial applications and does not cater at all to the hobbyist/student demographic. Their proprietary interfaces prioritizes function over form and can be intimidating and difficult to comprehend for beginners.
The competition is heavily geared towards industrial applications and does not cater at all to the hobbyist/student demographic. Their proprietary interfaces prioritizes function over form and can be intimidating and difficult to comprehend for beginners.
I realized that there was no shortage of companies creating Raspberry Pi Powered devices for industrial solutions. However what sets EdgePi apart from its competitors was its cloud capabilities and its intuitive, beginner friendly user interface accomplished through the EdgePi Portal.
I realized that there was no shortage of companies creating Raspberry Pi Powered devices for industrial solutions. However what sets EdgePi apart from its competitors was its cloud capabilities and its intuitive, beginner friendly user interface accomplished through the EdgePi Portal.
I realized that there was no shortage of companies creating Raspberry Pi Powered devices for industrial solutions. However what sets EdgePi apart from its competitors was its cloud capabilities and its intuitive, beginner friendly user interface accomplished through the EdgePi Portal.
02 /
02 /
02 /
DEFINING THE PROBLEM
DEFINING THE PROBLEM
DEFINING THE PROBLEM
Affinity Mapping / User Personas / User Journey
Affinity Mapping / User Personas / User Journey
Affinity Mapping / User Personas / User Journey
After consolidating my data gathered from the design ethnography stage, I chose to go into the define phase of the design process collaboratively with the team at OSENSA in order to familiarize the team that is relatively new to the field of interaction design to its methods, and to gain critical feedback early onbased on my colleague's expertise.
02.1 Co-design sessions to bring the conversation to the larger group
02.1 Co-design sessions to bring the conversation to the larger group
02.1 Co-design sessions to bring the conversation to the larger group
During the define phase, I created a physical affinity map to encourage my coworkers to join in on the conversation and help form insights and brainstorm ideas collaboratively.
The affinity mapping helped me organize the extremely diverse information from different stakeholders gathered from the design ethnography into a coherent and meaningful presentation. After the map was set up, some recurring themes and patterns began to appear.


02.2 Turning stakeholder defined target audiences into personas
02.2 Turning stakeholder defined target audiences into personas
02.2 Turning stakeholder defined target audiences into personas
EdgePi's 2 main target audiences were then presented as user persona archetypes, a mechatronics university student that regularly conducts personal electronic projects at home as a hobby, and a CEO looking for an cloud-based industrial PC to aid in factory automation.
These 2 archetypes was extremely useful in helping me ground my design and made sure I was cognizant of my user's diverse goals, preferences, and pain points. Often during setbacks that required design iterations, I would often go back to my personas to remind myself who I was designing for.


02.3 Visualizing the complete customer onboarding journey
02.3 Visualizing the complete customer onboarding journey
02.3 Visualizing the complete customer onboarding journey
Lastly, I created a journey map to create a visualization of the many processes and steps the user would go through when interacting with the EdgePi Portal. Each step of the map gave me potential areas of improvement as well as insight into steps that required a higher mental load from users.
The actor and POV of the journey map was one of my user personas. Unfortunately the data to inform the creation of the journey map was not 100% based on real data as I did not have the opportunity to interview a mechatronic student /hobbyist. I instead used the data that I've received from the in-house user interviews, field studies, and competitive analysis and try my best to link it to an individual from this user archetype.


03 /
03 /
03 /
IDEATION + PIVOT
IDEATION + PIVOT
IDEATION + PIVOT
Initial Ideation / The Pivot / Sketches
Initial Ideation / The Pivot / Sketches
Initial Ideation / The Pivot / Sketches
03.1 Incorpoating feedback into rapid ideation in low fidelity
03.1 Incorpoating feedback into rapid ideation in low fidelity
03.1 Incorpoating feedback into rapid ideation in low fidelity
The ideation of the Dashboard was an iterative process and I went back and forth between sketching, wire-framing and creating low-fidelity designs on Figma.
As many hardware and software components of the EdgePi was still being worked on, there would often be times where my requirements would change or new functionalities or restrictions would be added at a moments notice, forcing me to modify existing ideas or brainstorm new ones.


03.2 Uh oh. Here comes the pivot…
03.2 Uh oh. Here comes the pivot…
03.2 Uh oh. Here comes the pivot…
However as development of the EdgePi continued, with some major changes to the hardware of EdgePi, coupled with the software backend side learning more capabilities about the AWS IoT Device Shadow Service, EdgePi can now provide users with a lot more customizations to its functionalities through its portal than previously thought.
The portal originally thought to only control and store data from components as a module such as inputs, outputs, LED's, was later discovered that each individual port can now be manipulated by the user and have their data logged onto the cloud.
With the changes, I had to quickly pivot but soon realized that with the current ideation direction that there were simply too many configurations to have all actions on one screen.
I returned back to my affinity map and began modifying it to reflect some of the changes. I started brainstorming a design that incorporated the new functionality requirements while being mindful of EdgePi's target audiences as demonstrated by the 2 user personas created.
Reviewing the user journey, I began conceptualizing a Dashboard that was divided into View Mode and Edit Mode, in which the Dashboard will show the readings of each components and all configurations would be done through modal screens.


03.3 Back to the drawing board with another round of ideation
03.3 Back to the drawing board with another round of ideation
03.3 Back to the drawing board with another round of ideation
Learning from my previous mistake of increasing the fidelity of my interface ideations too quickly, I returned to the sketching phase to explore and iterate on various ideas.
With low fidelity sketches, it provided a high level exploration of how the EdgePi portal user interface would work without getting bogged down by the details. I was able to quickly visualize different concepts and present it in meetings that aided collaboration and communication. Based on the feedback from the team, I would adjust and refine the sketches accordingly.
Add a Device

Dashboard

Portal Homepage

Dashboard Cont.

Order History

Device Overview

Subscription Plan

Add a Device
Add a Device


Dashboard
Dashboard


Portal Homepage
Portal Homepage


Dashboard Cont.
Dashboard Cont.


Order History
Order History


Device Overview
Device Overview


Subscription Plan
Subscription Plan


04 /
04 /
04 /
MVP User Testing
MVP User Testing
MVP User Testing
MVP Testing / Testing Feedback / Design Iterations
MVP Testing / Testing Feedback / Design Iterations
MVP Testing / Testing Feedback / Design Iterations
04.1 Getting the EdgePi MVP into the hands of the community
04.1 Getting the EdgePi MVP into the hands of the community
04.1 Getting the EdgePi MVP into the hands of the community
With the first iteration of the Edgepi portal conceptualized and implemented, the first batch of EdgePi’s was sent out to members of the mechatronics community for user testing and feedback.
Participants was asked to run through the onboarding process and conduct several common core tasks and then share their thoughts through a questionaire at the end. Along with the team at OSENSA, we decided to set a number of key metrics and KPI's to gauge the success of the EdgePi Portal.
Given users, both industrial and recreational, having prior basic mechatronics knowledge ...
Task Success Rate
<80%
participants should be successful in completing the assigned core tasks using the portal.
Time on Task
<30sec.
participants should spend no longer than 30 seconds to configure a specific port.
SUS Score
<70pt+
participants should be ranking the portal MVP, a system usability scale score of greater than 75.
CSAT Score
<75pt+
participants should be ranking the portal MVP, a satisfaction score of greater than 75.


04.2 Valuable feedback and improvements from our users
04.2 Valuable feedback and improvements from our users
04.2 Valuable feedback and improvements from our users
The results of the 10 questionnaires was incredibly constructive in providing me with many areas of improvement and insights based on the key metrics set beforehand.
Albeit the small sample size, behavioural KPI’s such as the task success rate was an overwhelming 90%, with time on task hitting an average of 28 seconds depending on the core task. Attitudinal KPI’s however was missing the mark with both SUS and CSAT scores missing the benchmark.
Task Success Rate
90%
participants successfully completed the assigned core tasks using the portal.
Time on Task
28 sec.
was the average time participants spent to complete an assigned core task.
SUS Score
65pts
was the average score participants rated the MVP in regards to its usability.
CSAT Score
70pts
was the average score participants rated the MVP in regards to their satisfaction.
Although most test users are able to successfully complete the assigned core tasks, attitudinal KPI's were lagging.
From the questionnaire, users are quoting the logic for more complicated tasks between ports can be better presented in the UI. Test users using EdgePi within an industrial context had concerns the the readings were too small to be presented on a big screen and also requested some sort of pinning functionality.
04.3 Design Iterations in preparation for EdgePi's official release
04.3 Design Iterations in preparation for EdgePi's official release
04.3 Design Iterations in preparation for EdgePi's official release
Natural Mapping
Natural Mapping
Natural Mapping
The Differential (DIFF) and Resistance Temperature Detector (RTD) requires the use of multiple ports. Users were getting confused with the repeated readings shown.
Iterating on the feedback, I decided to add an icon composed of connector lines that groups the relation between the ports and the DIFF or RTD in an attempt to utilize "natural mapping" to make the experience feel more intuitive.
Before
Before
Before


After
After
After


Content Grouping
Content Grouping
Content Grouping
Changing the operating mode within a port's settings modal will in turn change the configurations under it. Users were confused why configuration options was changing.
By grouping the configurations available for each operating mode and styling it in a way where the configurations are under the operating mode in a hierarchal sense, inputs are presented to users in a more logical manner.
Before
Before
Before


After
After
After


Flexibility & Efficiency of Use
Flexibility & Efficiency of Use
Flexibility & Efficiency of Use
For users with multiple sensors and devices attached to EdgePi, finding the reading for a specific device proves to be difficult. Users requested some sort of pin functionality.
Added an enlarge and minimize functionality to specific readings for custom cards, allowing users to tailor the interface based on their own preferences and needs.
Before
Before
Before


After
After
After


Context, Tips & Empty States
Context, Tips & Empty States
Context, Tips & Empty States
More advanced users provided insight into areas where more novice users would encounter confusion and recommended further context and tips that could be added.
Added insightful tooltips and error messages to eliminate error prone conidtions for novice users.
New
New


New
New


New
New


05 /
05 /
05 /
Conclusion
Conclusion
Conclusion
Takeaways / Other Touch-Points
Takeaways / Other Touch-Points
Takeaways / Other Touch-Points
05.1 Learnings from shipping my first real-world product
05.1 Learnings from shipping my first real-world product
05.1 Learnings from shipping my first real-world product
I made a lot of mistakes, but it was an incredible learning opportunity nonetheless.
EdgePi was my first ever professional end-to-end experience that I shipped. I've learnt to trust the process.
Designing for EdgePi was particular daunting as it was an interface solution for a product that I had no expertise or background knowledge in. Luckily, the team at OSENSA was extremely sympathetic, provided me with a lot of insight into the product, and most importantly actively participated in the design process. They trusted me fully and I am truly very fortunate to be given this opportunity.
Real-world requirements often change... learning to adapt is a critical skill.
Unlike school projects, projects done in a professional context often have many interconnected parts and changing variables.
Requirements change, new variables gets introduced, and problems often arise requiring me to think of workaround or rethink my solution completely. This experience really highlighted the importance of a structured iterative design process, with each step building off of the next.
Involving stakeholders early on in the process when possible was critical.
The UI design of the interface is only one part of a bigger picture. As the UX Designer, my work revolves around many other disciplines.
Throughout my co-op, I worked closely with the development team, making sure to bring them in right from the beginning of the design process. Looking back, this was the correct decision as team members was able to freely add their expertise into the conversation.
05.2 Other touch points I designed
05.2 Other touch points I designed
05.2 Other touch points I designed


EdgePi Website
Designed using Figma and implemented using Wix the EdgePi website that goes into depth the device's applications, software and hardware capabilities, as well as a forum and blog for enthusiasts to keep up to date with our development.


EdgePi Packaging
Designed the packaging box the EdgePi will be shipped in. Ideated on Figma and refined on Adobe Illustrator. Conducted supplier relations by contacting different vendors, compared samples, and prepared the relevant design files.


EdgePi Enclosure
Designed the printed label on the EdgePi's enclosure. Used Adobe Illustrator to design a label that labels each of the physical ports in a compact yet intuitive manner. Again, conducted supplier relations and prepared the design files.
01 /
DESIGN ETHNOGRAPHY
Stakeholder Interviews / Site Visit / Competitive Analysis
EdgePi was a complicated industrial PC with both hardware and software elements that required specific technical knowledge that I did not possess. At the beginning, it was important for me to spend some time understanding the context of the product before I head into ideation.
01.1 Understanding the ask from the stakeholders
Primary phase of my user research involved inquiring about EdgePi as an Industrial PC, expectations for the interface from the team, and possible pain points that may arise.
OSENSA Innovations
Chief Technological Officer
Gathered insight into the capabilities of EdgePi, the context of the problem, and the functionalities the portal must possess.
“The EdgePi Portal is what sets our Raspberry Pi Powered industrial PC from our competitors. A good balance will have to be struck between the inherent complexity of an industrial PC and learnability of our portal interface in order to cater to our broad target audience.”
OSENSA Innovations
Back-end Developer
Gathered insight into the development logic that the EdgePi Portal UI will use in order to control the EdgePi device remotely.
“We will be primarily using AWS IoT Device Shadow Service to control the device. The EdgePi Portal interface should present the state of each configuration on the EdgePi and have input controls for users to change those said states.”
OSENSA Innovations
Front-end Developer
Gathered insight into how the portal interface would be implemented and any constraints or feasibility issues that may arise.
“The EdgePi Portal interface would be coded using ReactJS and Chakra UI. Both of these programs have component libraries that could be used in the design to make my life easier, although new design elements can also be created if needed.”
OSENSA Innovations
Back-end Developer
Gathered insight into the hardware anatomy of an EdgePi device such as its ports, microchips and boards.
“EdgePi in summary is a cloud integrated industrial PC, PLC (Programmable Logic Controller), and IoT edge device, with multiple channels of input and outputs. Most of the ports will have to be configured somehow using the portal.”
01.2 Immersing myself into EdgePi's real-world use case
Secondary Phase of my user research involved scheduling a walkthrough with a mechatronics engineer to walkthrough the real-world use cases of EdgePi.

Understanding EdgePi is still a work-in-progress
Visited the in-house cleanroom where the first batch of EdgePi's are being built. Prototypes are currently undergoing QA and QC testing before full production.

Understanding EdgePi in a Home and School setting.
Visited a mechatronic's workspace where different breadboard setups were being set up, imitating what it would look for hobbyists and students using EdgePi.

Understanding EdgePi in an Industrial Automation setting.
Visited the mechatronic lab where different boards were being tested to cater towards professionals using EdgePi in an industrial setting such as factory automation.
01.3 Learning from what's out there already
Final phase of my user research comprised of gaining an understanding of existing related products in the market in order to gauge EdgePi's strength and weaknesses.
EdgePi was a complicated industrial PC with both hardware and software elements that required specific technical knowledge that I did not possess. At the beginning, it was important for me to spend some time understanding the context of the product before I head into ideation.


The competition is heavily geared towards industrial applications and does not cater at all to the hobbyist/student demographic. Their proprietary interfaces prioritizes function over form and can be intimidating and difficult to comprehend for beginners.
I realized that there was no shortage of companies creating Raspberry Pi Powered devices for industrial solutions. However what sets EdgePi apart from its competitors was its cloud capabilities and its intuitive, beginner friendly user interface accomplished through the EdgePi Portal.
02 /
DEFINING THE PROBLEM
Affinity Mapping / User Personas / User Journey
After consolidating my data gathered from the design ethnography stage, I chose to go into the define phase of the design process collaboratively with the team at OSENSA in order to familiarize the team that is relatively new to the field of interaction design to its methods, and to gain critical feedback early onbased on my colleague's expertise.
02.1 Co-design sessions to bring the conversation to the larger group
During the define phase, I created a physical affinity map to encourage my coworkers to join in on the conversation and help form insights and brainstorm ideas collaboratively.
The affinity mapping helped me organize the extremely diverse information from different stakeholders gathered from the design ethnography into a coherent and meaningful presentation. After the map was set up, some recurring themes and patterns began to appear.

02.2 Turning stakeholder defined target audiences into personas
EdgePi's 2 main target audiences were then presented as user persona archetypes, a mechatronics university student that regularly conducts personal electronic projects at home as a hobby, and a CEO looking for an cloud-based industrial PC to aid in factory automation.
These 2 archetypes was extremely useful in helping me ground my design and made sure I was cognizant of my user's diverse goals, preferences, and pain points. Often during setbacks that required design iterations, I would often go back to my personas to remind myself who I was designing for.


02.3 Visualizing the complete customer onboarding journey
Lastly, I created a journey map to create a visualization of the many processes and steps the user would go through when interacting with the EdgePi Portal. Each step of the map gave me potential areas of improvement as well as insight into steps that required a higher mental load from users.
The actor and POV of the journey map was one of my user personas. Unfortunately the data to inform the creation of the journey map was not 100% based on real data as I did not have the opportunity to interview a mechatronic student /hobbyist. I instead used the data that I've received from the in-house user interviews, field studies, and competitive analysis and try my best to link it to an individual from this user archetype.

03 /
IDEATION + PIVOT
Initial Ideation / The Pivot / Sketches
03.1 Incorpoating feedback into rapid ideation in low fidelity
The ideation of the Dashboard was an iterative process and I went back and forth between sketching, wire-framing and creating low-fidelity designs on Figma.
As many hardware and software components of the EdgePi was still being worked on, there would often be times where my requirements would change or new functionalities or restrictions would be added at a moments notice, forcing me to modify existing ideas or brainstorm new ones.


03.2 Uh oh. Here comes the pivot…
However as development of the EdgePi continued, with some major changes to the hardware of EdgePi, coupled with the software backend side learning more capabilities about the AWS IoT Device Shadow Service, EdgePi can now provide users with a lot more customizations to its functionalities through its portal than previously thought.
The portal originally thought to only control and store data from components as a module such as inputs, outputs, LED's, was later discovered that each individual port can now be manipulated by the user and have their data logged onto the cloud.
With the changes, I had to quickly pivot but soon realized that with the current ideation direction that there were simply too many configurations to have all actions on one screen.
I returned back to my affinity map and began modifying it to reflect some of the changes. I started brainstorming a design that incorporated the new functionality requirements while being mindful of EdgePi's target audiences as demonstrated by the 2 user personas created.
Reviewing the user journey, I began conceptualizing a Dashboard that was divided into View Mode and Edit Mode, in which the Dashboard will show the readings of each components and all configurations would be done through modal screens.

03.3 Back to the drawing board with another round of ideation
Learning from my previous mistake of increasing the fidelity of my interface ideations too quickly, I returned to the sketching phase to explore and iterate on various ideas.
With low fidelity sketches, it provided a high level exploration of how the EdgePi portal user interface would work without getting bogged down by the details. I was able to quickly visualize different concepts and present it in meetings that aided collaboration and communication. Based on the feedback from the team, I would adjust and refine the sketches accordingly.
Add a Device

Dashboard

Portal Homepage

Dashboard Cont.

Order History

Device Overview

Subscription Plan

Add a Device

Dashboard

Portal Homepage

Dashboard Cont.

Order History

Device Overview

Subscription Plan

04 /
MVP User Testing
MVP Testing / Testing Feedback / Design Iterations
04.1 Getting the EdgePi MVP into the hands of the community
With the first iteration of the Edgepi portal conceptualized and implemented, the first batch of EdgePi’s was sent out to members of the mechatronics community for user testing and feedback.
Participants was asked to run through the onboarding process and conduct several common core tasks and then share their thoughts through a questionaire at the end. Along with the team at OSENSA, we decided to set a number of key metrics and KPI's to gauge the success of the EdgePi Portal.
Given users, both industrial and recreational, having prior basic mechatronics knowledge ...
Task Success Rate
<80%
participants should be successful in completing the assigned core tasks using the portal.
Time on Task
<30sec.
participants should spend no longer than 30 seconds to configure a specific port.
SUS Score
<70pt+
participants should be ranking the portal MVP, a system usability scale score of greater than 75.
CSAT Score
<75pt+
participants should be ranking the portal MVP, a satisfaction score of greater than 75.

04.2 Valuable feedback and improvements from our users
The results of the 10 questionnaires was incredibly constructive in providing me with many areas of improvement and insights based on the key metrics set beforehand.
Albeit the small sample size, behavioural KPI’s such as the task success rate was an overwhelming 90%, with time on task hitting an average of 28 seconds depending on the core task. Attitudinal KPI’s however was missing the mark with both SUS and CSAT scores missing the benchmark.
Task Success Rate
90%
participants successfully completed the assigned core tasks using the portal.
Time on Task
28 sec.
was the average time participants spent to complete an assigned core task.
SUS Score
65pts
was the average score participants rated the MVP in regards to its usability.
CSAT Score
70pts
was the average score participants rated the MVP in regards to their satisfaction.
Although most test users are able to successfully complete the assigned core tasks, attitudinal KPI's were lagging.
From the questionnaire, users are quoting the logic for more complicated tasks between ports can be better presented in the UI. Test users using EdgePi within an industrial context had concerns the the readings were too small to be presented on a big screen and also requested some sort of pinning functionality.
04.3 Design Iterations in preparation for EdgePi's official release
Natural Mapping
The Differential (DIFF) and Resistance Temperature Detector (RTD) requires the use of multiple ports. Users were getting confused with the repeated readings shown.
Iterating on the feedback, I decided to add an icon composed of connector lines that groups the relation between the ports and the DIFF or RTD in an attempt to utilize "natural mapping" to make the experience feel more intuitive.
Before

After

Content Grouping
Changing the operating mode within a port's settings modal will in turn change the configurations under it. Users were confused why configuration options was changing.
By grouping the configurations available for each operating mode and styling it in a way where the configurations are under the operating mode in a hierarchal sense, inputs are presented to users in a more logical manner.
Before

After

Flexibility & Efficiency of Use
For users with multiple sensors and devices attached to EdgePi, finding the reading for a specific device proves to be difficult. Users requested some sort of pin functionality.
Added an enlarge and minimize functionality to specific readings for custom cards, allowing users to tailor the interface based on their own preferences and needs.
Before

After

Context, Tips & Empty States
More advanced users provided insight into areas where more novice users would encounter confusion and recommended further context and tips that could be added.
Added insightful tooltips and error messages to eliminate error prone conidtions for novice users.
New

New

New

05 /
Conclusion
Takeaways / Other Touch-Points
05.1 Learnings from shipping my first real-world product
I made a lot of mistakes, but it was an incredible learning opportunity nonetheless.
EdgePi was my first ever professional end-to-end experience that I shipped. I've learnt to trust the process.
Designing for EdgePi was particular daunting as it was an interface solution for a product that I had no expertise or background knowledge in. Luckily, the team at OSENSA was extremely sympathetic, provided me with a lot of insight into the product, and most importantly actively participated in the design process. They trusted me fully and I am truly very fortunate to be given this opportunity.
Real-world requirements often change... learning to adapt is a critical skill.
Unlike school projects, projects done in a professional context often have many interconnected parts and changing variables.
Requirements change, new variables gets introduced, and problems often arise requiring me to think of workaround or rethink my solution completely. This experience really highlighted the importance of a structured iterative design process, with each step building off of the next.
Involving stakeholders early on in the process when possible was critical.
The UI design of the interface is only one part of a bigger picture. As the UX Designer, my work revolves around many other disciplines.
Throughout my co-op, I worked closely with the development team, making sure to bring them in right from the beginning of the design process. Looking back, this was the correct decision as team members was able to freely add their expertise into the conversation.
05.2 Other touch points I designed

EdgePi Website
Designed using Figma and implemented using Wix the EdgePi website that goes into depth the device's applications, software and hardware capabilities, as well as a forum and blog for enthusiasts to keep up to date with our development.

EdgePi Packaging
Designed the packaging box the EdgePi will be shipped in. Ideated on Figma and refined on Adobe Illustrator. Conducted supplier relations by contacting different vendors, compared samples, and prepared the relevant design files.

EdgePi Enclosure
Designed the printed label on the EdgePi's enclosure. Used Adobe Illustrator to design a label that labels each of the physical ports in a compact yet intuitive manner. Again, conducted supplier relations and prepared the design files.
